By: Team F14-B4 Since: Jan 2018 Licence: MIT
1. Introduction
1.1. What is Bibliotek
Bibliotek is a free book cataloguing application that is simple, fast, and easy to use. It is targeted at heavy readers who require a hassle-free way of managing and keep tracking of their read and unread books.
1.2. Core team
Bibliotek was developed and is maintained by Team F14-B4. Feel free to contact us for any enquries.
1.3. Contributing
Bibliotek is an open source project and contributors are always welcome. To get involved, start by reading Section 2, “Setting up”.
2. Setting up
This section includes the instructions to set up your development environment.
2.1. Prerequisites
Prior to setting up the project proper, make sure you have the following.
-
JDK
1.8.0_60or laterHaving any Java 8 version is not enough.
This app will not work with earlier versions of Java 8.
You can get the latest Java 8 JDK at this link. -
IntelliJ IDE
IntelliJ by default has Gradle and JavaFx plugins installed.
Do not disable them. If you have disabled them, go toFile>Settings>Pluginsto re-enable them.
2.2. Setting up the project in your computer
To setup the project in IntelliJ, follow the steps below.
-
Fork this repo, and clone the fork to your computer.
-
Open IntelliJ (if you are not in the welcome screen, click
File>Close Projectto close the existing project dialog first). -
Set up the correct JDK version for Gradle.
-
Click
Configure>Project Defaults>Project Structure. -
Click
New…and find the directory of the JDK.
-
-
Click
Import Project. -
Locate the
build.gradlefile and select it. ClickOK. -
Click
Open as Project. -
Click
OKto accept the default settings. -
Open a console and run the command
gradlew processResources(Mac/Linux:./gradlew processResources). It should finish with theBUILD SUCCESSFULmessage.
This will generate all resources required by the application and tests.
2.3. Verifying the setup
To verify that the setup is completed successfully, you should:
-
Run the
seedu.address.MainAppand try a few commands. -
Run the tests to ensure they all pass.
2.4. Configurations to do before writing code
This subsection includes configurations that you may find necessary or useful as you work on this project. We recommend that you make these configuration changes and additions before you start writing code.
2.4.1. Configuring the coding style
This project follows oss-generic coding standards. IntelliJ’s default style is mostly compliant with ours but it uses a different import order from ours. Follow the instructions below to rectify this.
-
Go to
File>Settings…(Windows/Linux), orIntelliJ IDEA>Preferences…(macOS). -
Select
Editor>Code Style>Java. -
Click on the
Importstab to set the order.-
For
Class count to use import with '*'andNames count to use static import with '*': Set to999to prevent IntelliJ from contracting the import statements. -
For
Import Layout: The order isimport static all other imports,import java.*,import javax.*,import org.*,import com.*,import all other imports. Add a<blank line>between eachimport.
-
Optionally, you can follow the UsingCheckstyle.adoc document to configure Intellij to check style-compliance as you write code.
2.4.2. Updating documentation to match your fork
After forking the repo, links in the documentation will still point to the se-edu/addressbook-level4 repo. If you plan to develop this as a separate product (i.e. instead of contributing to the se-edu/addressbook-level4) , you should replace the URL in the variable repoURL in DeveloperGuide.adoc and UserGuide.adoc with the URL of your fork.
2.4.3. Setting up CI
Set up Travis to perform Continuous Integration (CI) for your fork. See UsingTravis.adoc to learn how to set it up.
After setting up Travis, you can optionally set up coverage reporting for your team fork (see UsingCoveralls.adoc).
| Coverage reporting could be useful for a team repository that hosts the final version but it is not that useful for your personal fork. |
Optionally, you can set up AppVeyor as a second CI (see UsingAppVeyor.adoc).
| Having both Travis and AppVeyor ensures your App works on both Unix-based platforms and Windows-based platforms (Travis is Unix-based and AppVeyor is Windows-based). |
2.4.4. Getting started with coding
When you are ready to start coding:
-
Get some sense of the overall design by reading Section 3.1, “Architecture”.
-
Take a look at Appendix A, Suggested Programming Tasks to Get Started.
3. Design
This section documents the design and interaction of components in Bibliotek. Please take a moment to understand the different components before making any code changes.
3.1. Architecture
The Architecture Diagram in Figure 1 explains the high-level design of the App.
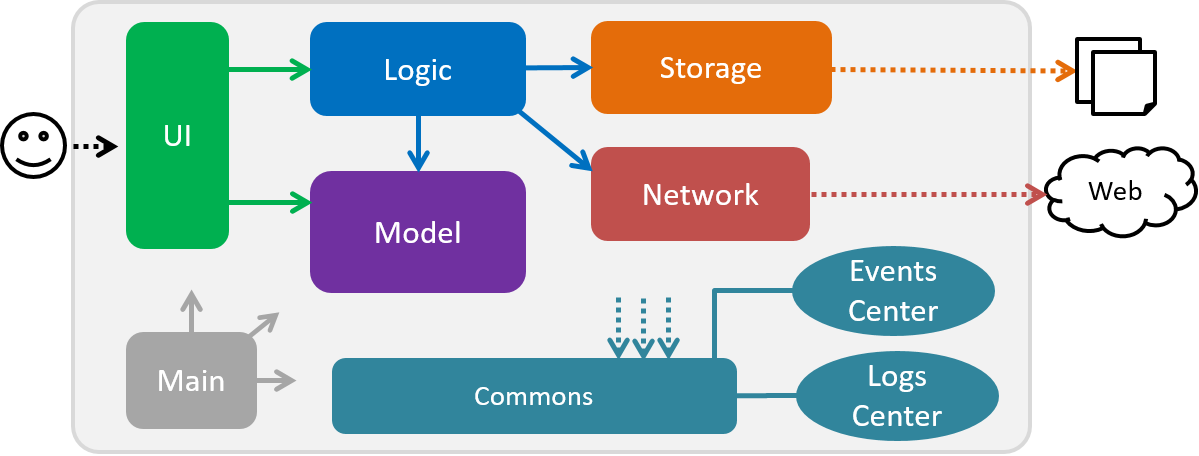
The .pptx files used to create diagrams in this document can be found in the diagrams folder. To update a diagram, modify the diagram in the pptx file, select the objects of the diagram, and choose Save as picture.
|
Given below is a quick overview of each component.
Main has only one class called MainApp. Its responsibilities are as follows.
-
At app launch: Initializes the components in the correct sequence, and connects them up with each other.
-
At shut down: Shuts down the components and invokes cleanup method where necessary.
Commons represents a collection of classes used by multiple other components. Two of those classes play important roles at the architecture level.
-
EventsCenter: This class (written using Google’s Event Bus library) is used by components to communicate with other components using events (i.e. a form of Event Driven design). -
LogsCenter: Used by many classes to write log messages to the App’s log file.
The rest of the App consists of five components. These components and a brief summary of their responsibilities are given below.
Each of the five components:
-
Defines its API in an
interfacewith the same name as the Component. -
Exposes its functionality using a
{Component Name}Managerclass.
For example, the Logic component defines it’s API in the Logic.java interface and exposes its functionality using the LogicManager.java class.
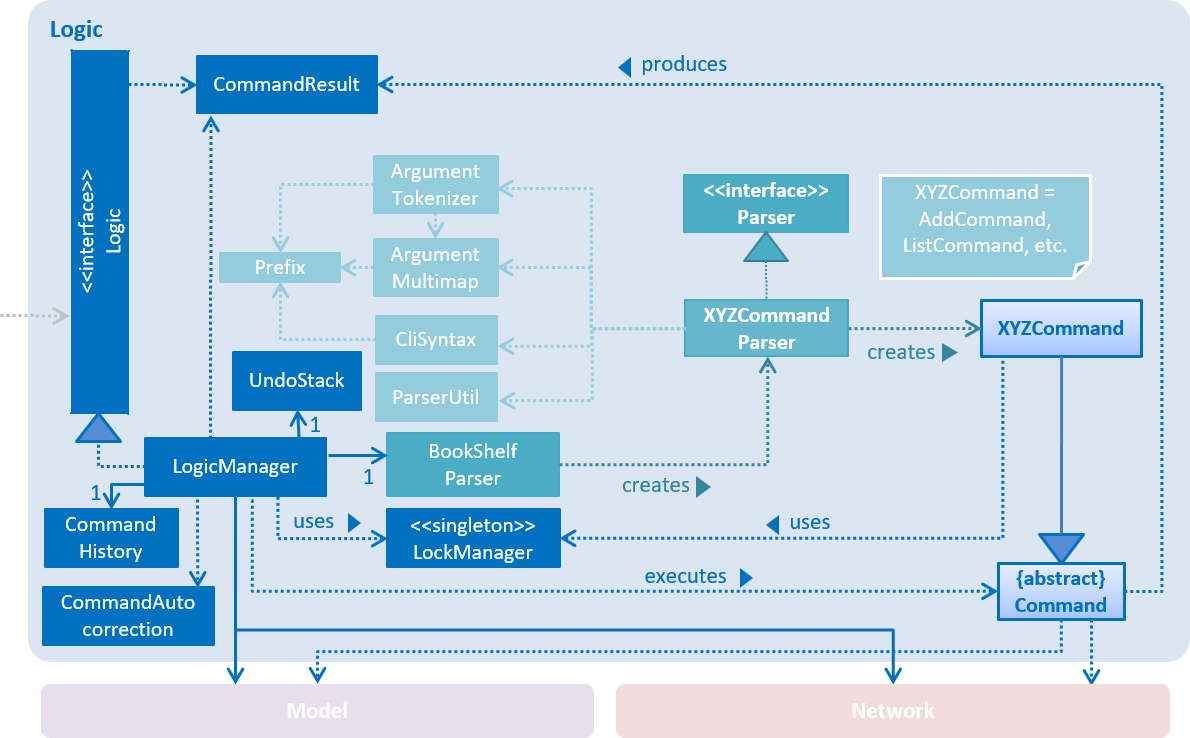
The Class Diagram in Figure 2 shows the interaction between different classes in the Logic component.
Events-Driven nature of the design
The Sequence Diagram in Figure 3 shows how the components interact for the scenario where the user issues the command delete 1.
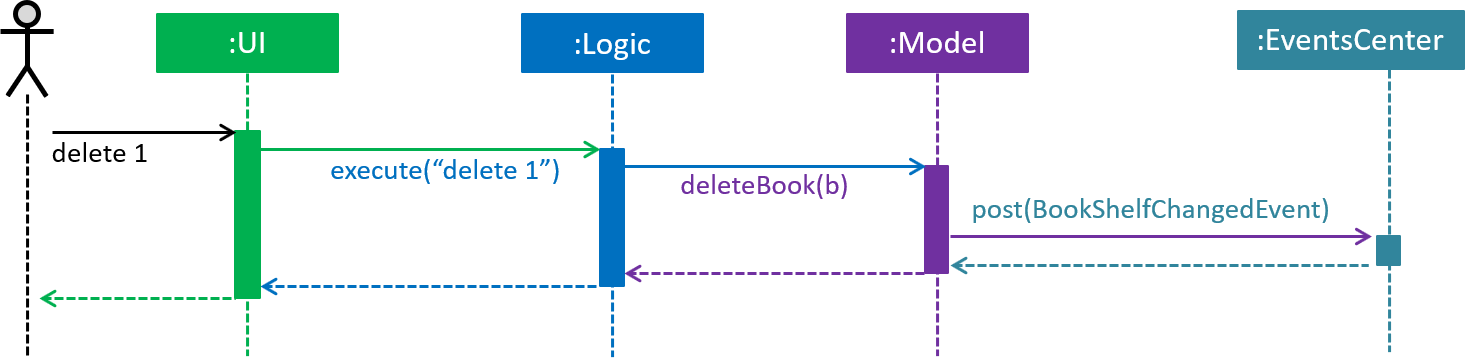
delete 1 command (part 1)
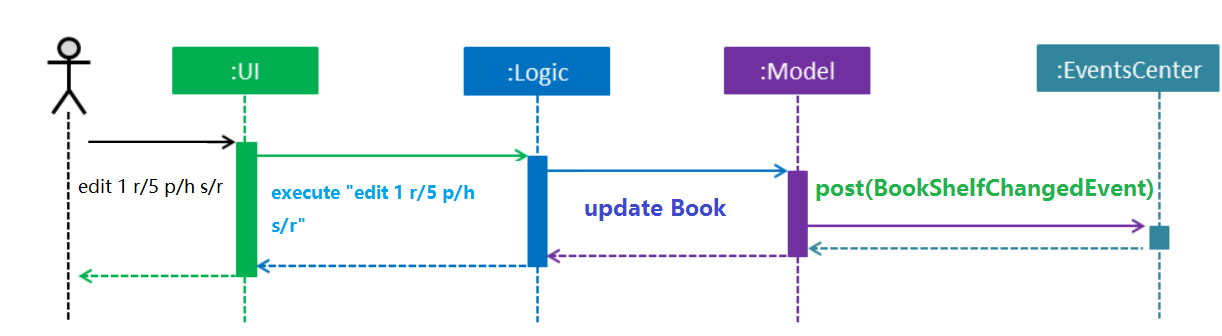
Note how the Model simply raises a BookShelfChangedEvent when the BookShelf data is changed, instead of asking Storage to save the updates to the hard disk.
|
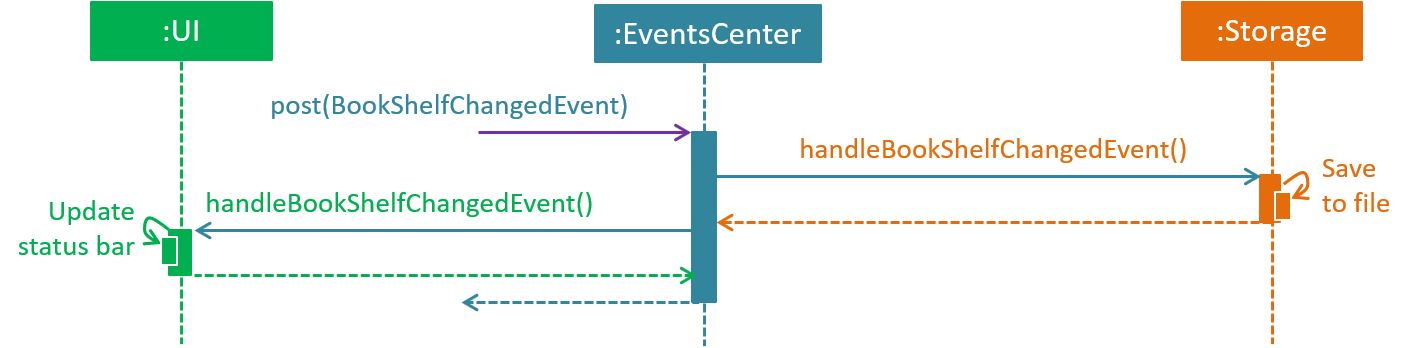
Figure 4 shows how the EventsCenter reacts to that event, which eventually results in the updates being saved to the hard disk and the status bar of the UI being updated to reflect the 'Last Updated' time.
delete 1 command (part 2)
Note how the event is propagated through the EventsCenter to the Storage and UI without Model having to be coupled to either of them. This is an example of how this Event Driven approach helps us reduce direct coupling between components.
|
The sections below give more details of each component.
3.2. UI component
The Class Diagram in Figure 5 shows the interaction between different classes in the Ui component.
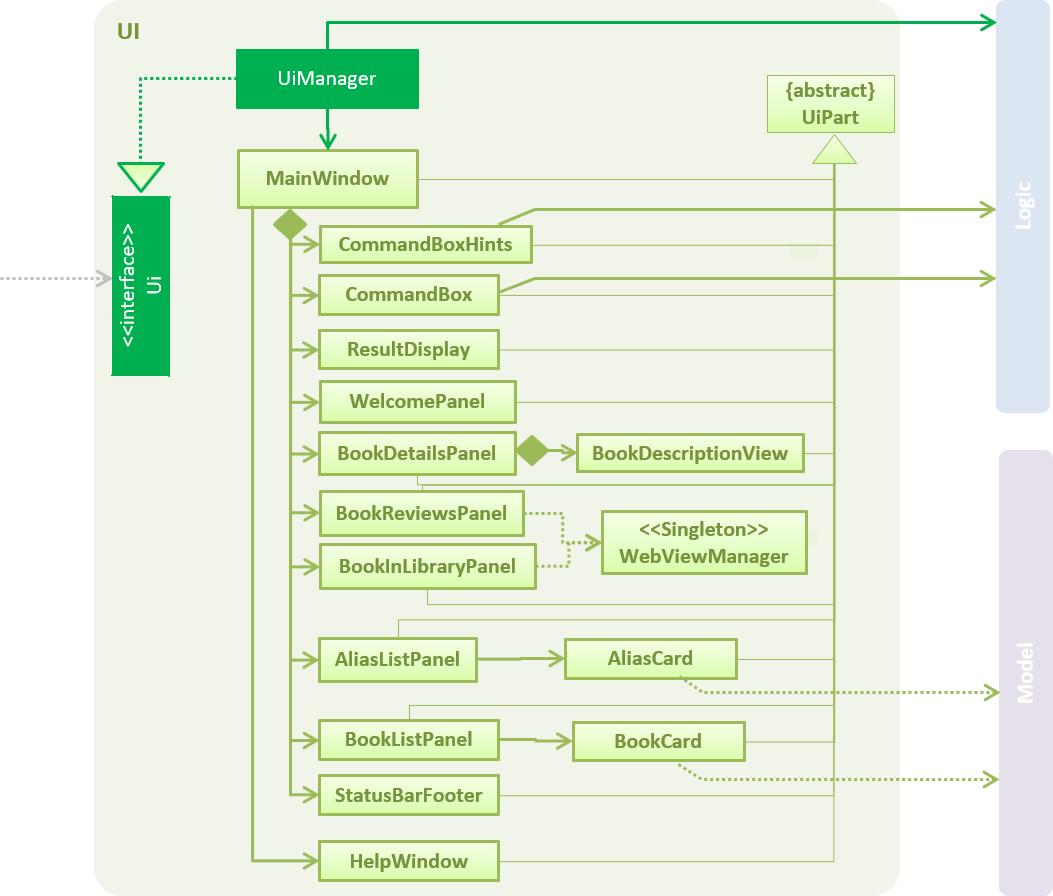
API : Ui.java
The UI consists of a MainWindow that is made up of parts, such as CommandBox, ResultDisplay, BookListPanel, StatusBarFooter, BookDetailsPanel, etc. All these, including the MainWindow, inherit from the abstract UiPart class.
The Ui component uses JavaFx UI framework. The layout of these UI parts are defined in matching .fxml files that are in the src/main/resources/view folder. For example, the layout of the MainWindow is specified in MainWindow.fxml.
The key functionalities of the Ui component are:
-
Executing user commands using the
Logiccomponent. -
Binding itself to some data in the
Modelso that the UI can auto-update when data in theModelchange. -
Responding to events raised from various parts of the App and updating the UI accordingly.
3.3. Logic component
The Class Diagram in Figure 6 shows the interaction between different classes in the Logic component.
The Logic component is home to various classes which extends Command. These classes represent supported commands that may or may not be undoable.
The structural relationship between Command and UndoableCommand is shown in Figure 7 below.
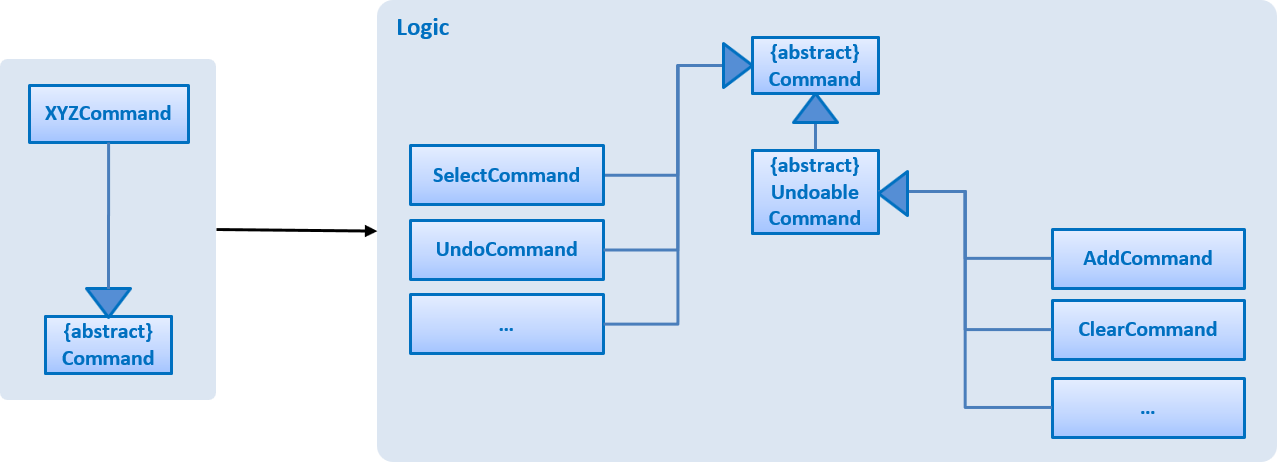
XYZCommand and Command in Figure 6, “Structure of the Logic Component”
An UndoableCommand is a command that makes changes to the book shelf data.
|
API :
Logic.java
The following is the general workflow when the user enters some input.
-
Logicuses theBookShelfParserclass to parse the user input. -
This results in a
Commandobject which is executed by theLogicManager. -
The command execution can affect the
Model(e.g. adding a book), make web API calls using theNetwork, and/or raise events. -
The result of the command execution is encapsulated as a
CommandResultobject which is passed back to theUi.
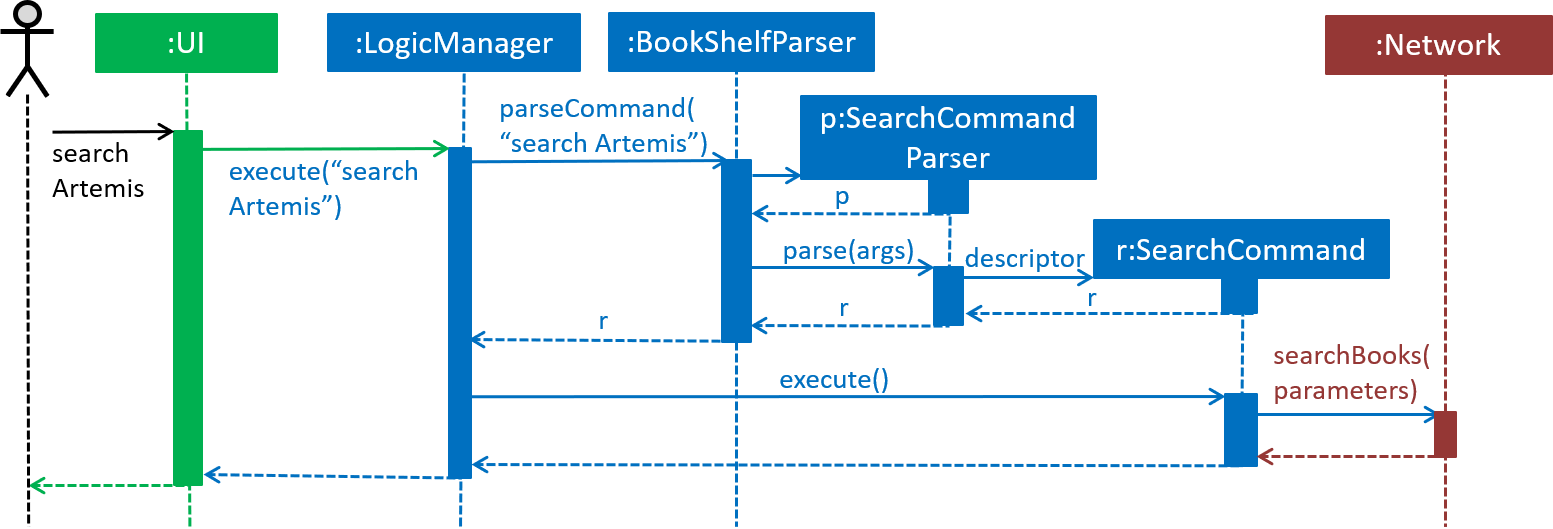
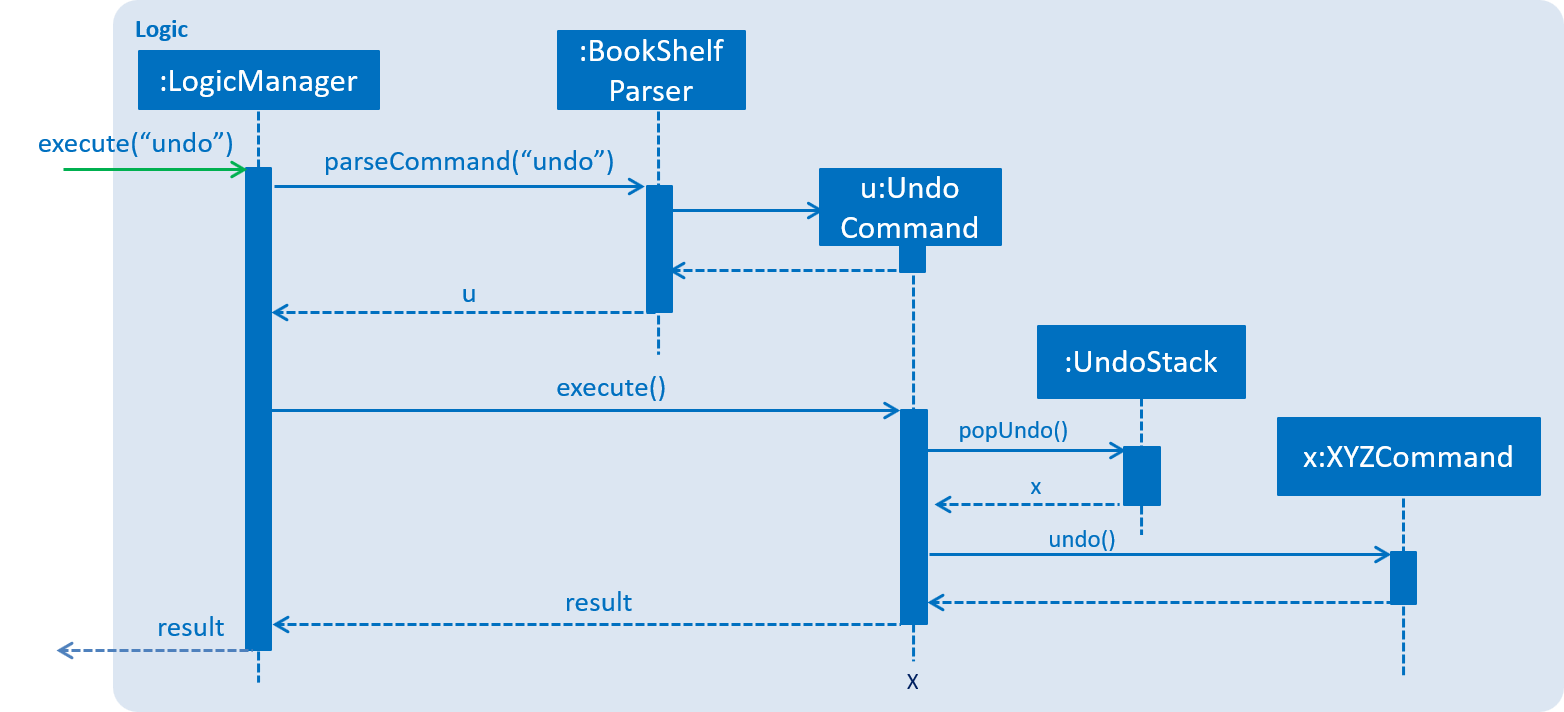
The Sequence Diagram in Figure 8 shows the interactions within the Logic component for the execute("delete 1") API call.
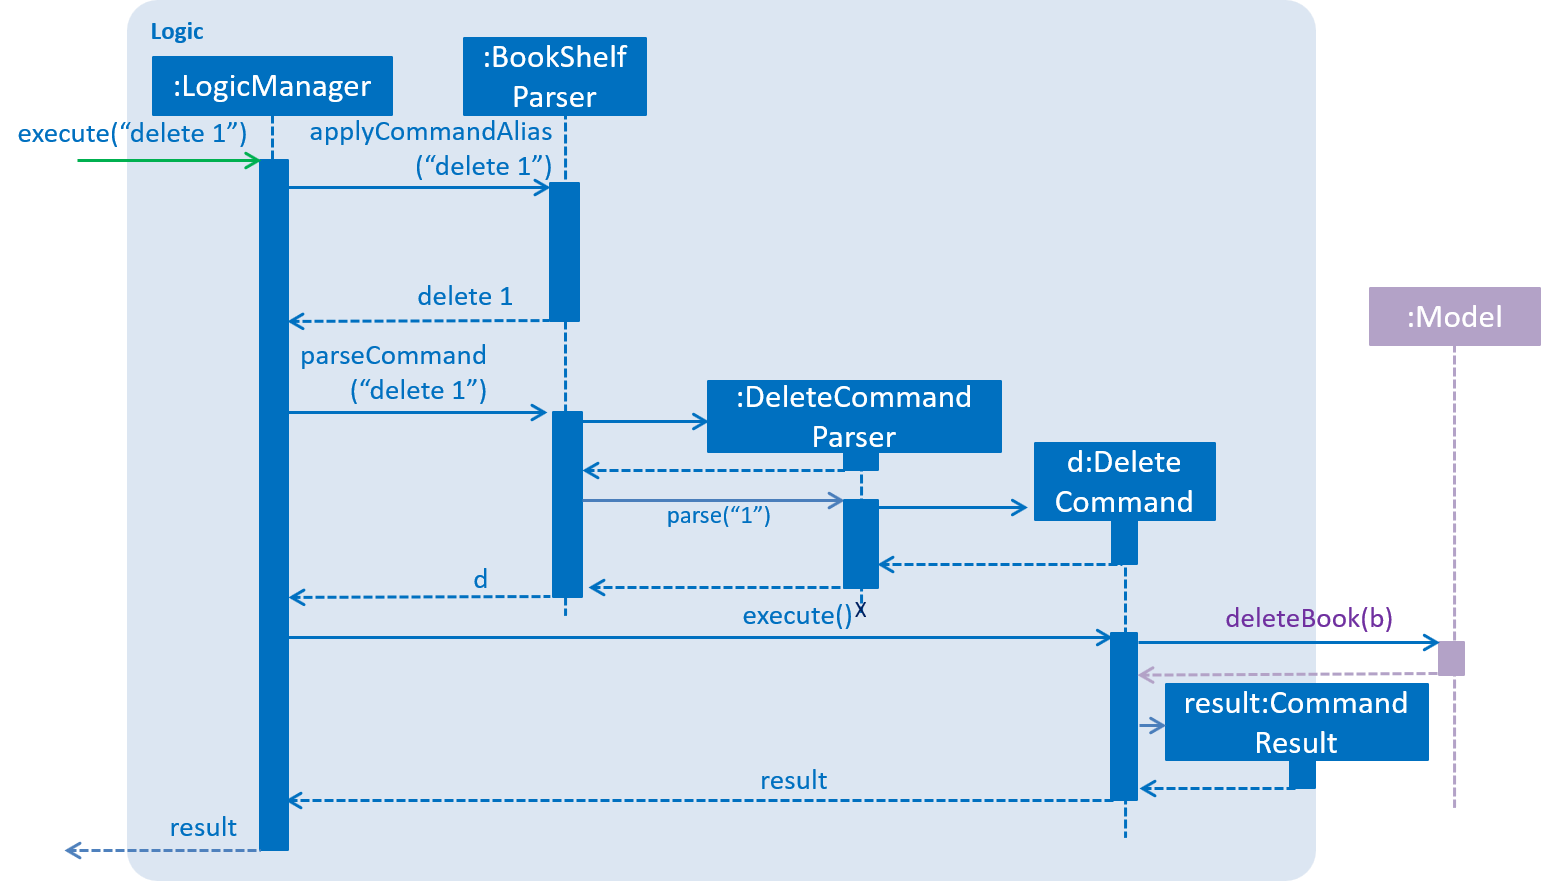
delete 1 Command3.4. Model component
The Class Diagram in Figure 9 shows the interaction between different classes in the Model component.
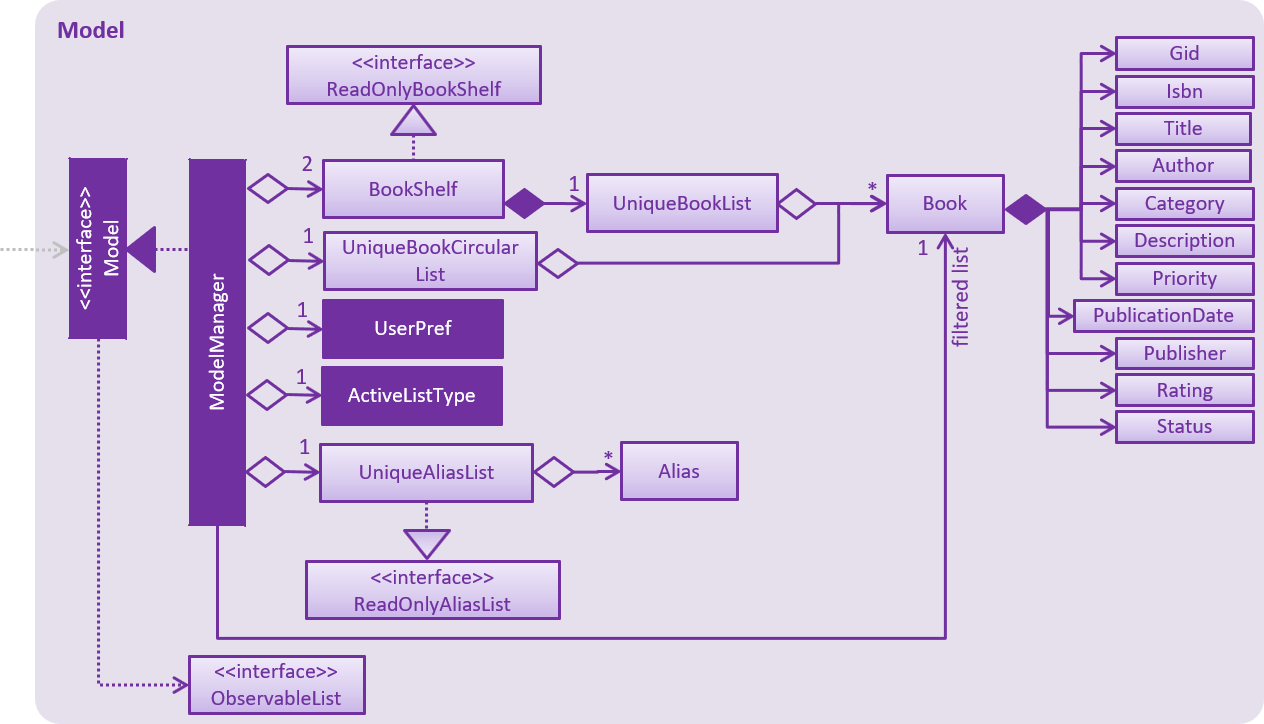
API : Model.java
The Model:
-
stores a
UserPrefobject that represents the user’s preferences. -
stores the
BookShelfdata. -
stores the user added aliases.
-
exposes an unmodifiable
ObservableList<Book>that can be 'observed' e.g. the UI can be bound to this list so that the UI automatically updates when the data in the list changes. -
does not depend on any of the other components.
3.5. Storage component
The Class Diagram in Figure 10 shows the interaction between different classes in the Storage component.
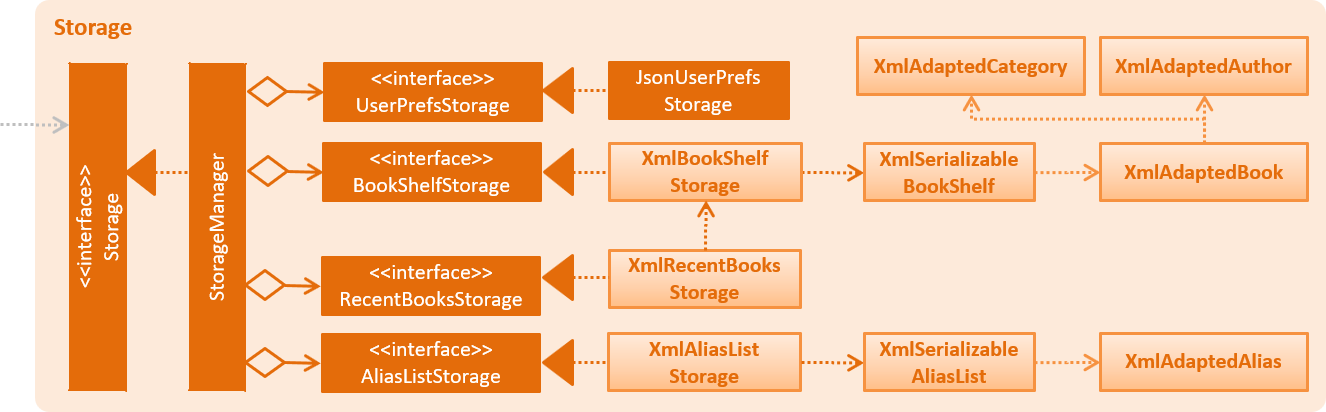
API : Storage.java
The Storage component:
-
can save
UserPrefobjects in json format and read it back. -
can save the
BookShelfdata in xml format and read it back. -
can save the recently selected books data in xml format and read it back.
-
can save the
UniqueAliasListdata in xml format and read it back. -
does not depend on any of the other four components.
3.6. Network component
The Class Diagram in Figure 11 shows the interaction between different classes in the Network component.
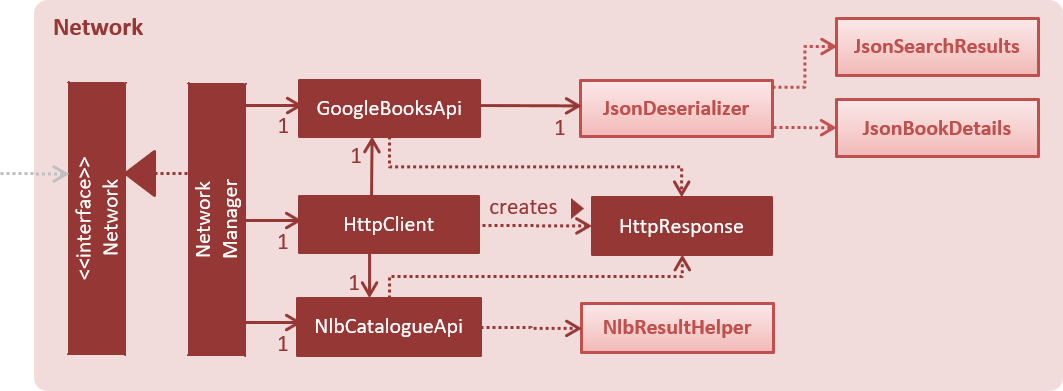
API: Network.java
The Network component:
-
can make asynchronous web API calls to Google Books API.
-
can make asynchronous web API calls to NLB catalogue.
-
does not depend on any of the other four components.
4. Implementation
This section describes some noteworthy details on how certain features are implemented.
4.1. Search feature
The search feature allows the user to search for books on Google Books that matches some user-specified parameters.
This allows the user to easily search for particular books, and to add them without having to enter all the information manually (using the add command).
4.1.1. Current Implementation
Network component
As part of the implementation of the search feature, the network component was added to allow for communicating with online services. An overview of the network component can be found in Section 3.6, “Network component”.
The Network object is passed by LogicManager into each Command, and is available for use by default, without the need for the Command to override setData.
The Network API exposes various methods for making web API calls to various endpoints.
Apart from those, it also provides a stop method that allows for graceful shutdown of the internal asynchronous HTTP client.
As an example, if a command needs to retrieve search results from Google Books API, it can make a call to the searchBooks method of the Network API.
The following sequence diagram shows what happens when searchBooks is called:
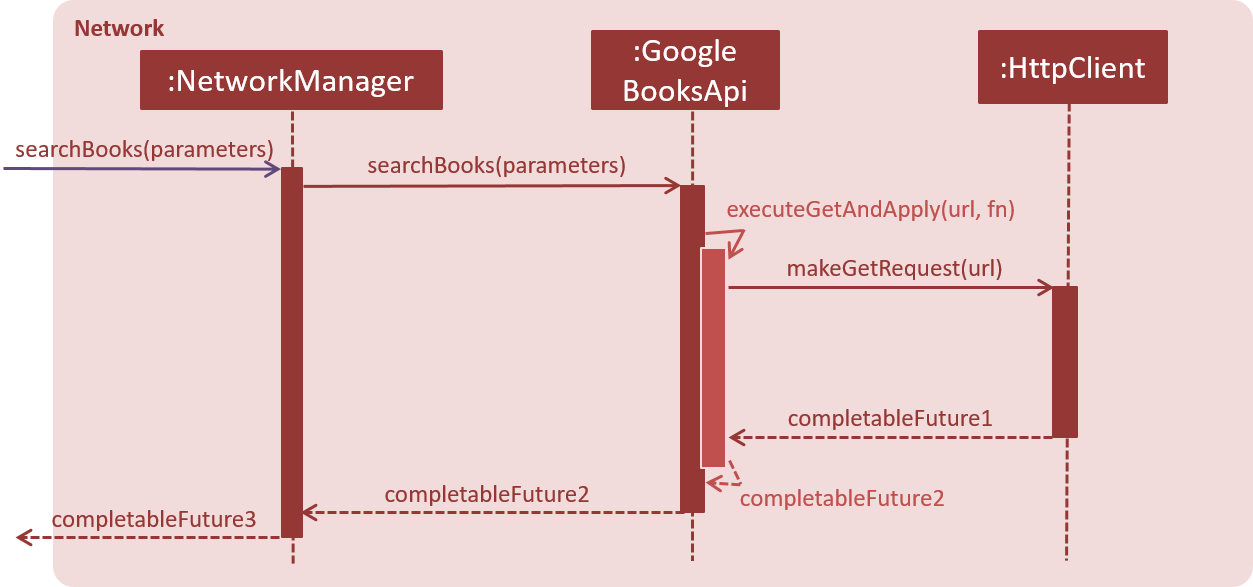
The methods shown above are asynchronous - they will not wait for the completion of the HTTP request.
In particular, note that when Network#searchBooks finishes execution, the HTTP request might not have completed yet.
This is accomplished through the use of a chain of CompletableFuture objects, which holds the operations that the above methods wish to apply to the data.
This is most evident in the executeGetAndApply method, as shown below:
    private <T> CompletableFuture<T> executeGetAndApply(String url, Function<String, ? extends T> fn) {
        return httpClient
                .makeGetRequest(url)
                .thenApply(GoogleBooksApi::requireJsonContentType)
                .thenApply(GoogleBooksApi::requireHttpStatusOk)
                .thenApply(HttpResponse::getResponseBody)
                .thenApply(fn);
    }
Once the HTTP request completes, the operations in the CompletableFuture objects will be executed. These operations are summarized by the following activity diagram:
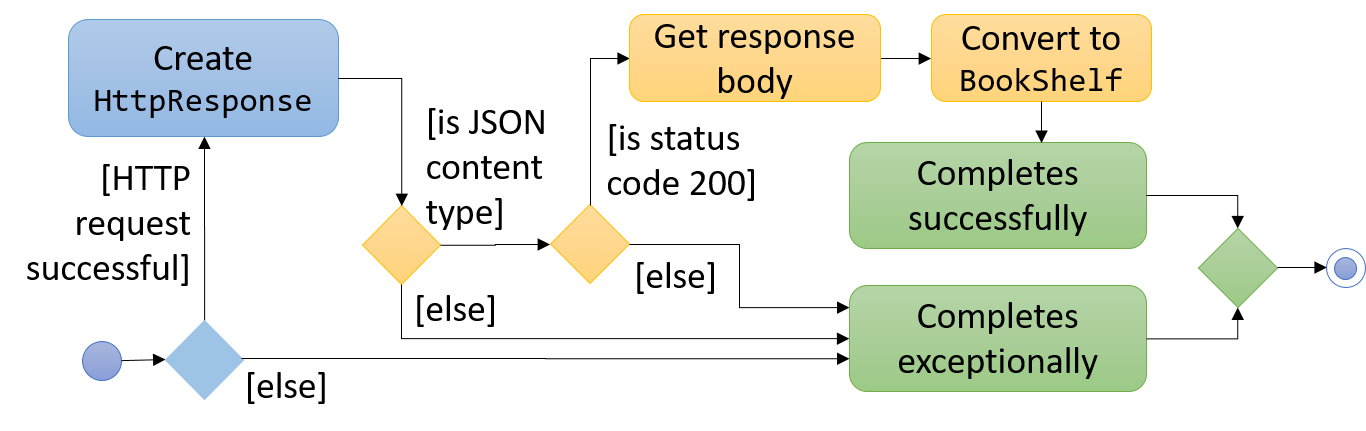
If the HTTP request fails, the response is unexpected, or the conversion to BookShelf fails, then the proceeding operations
added by the calls to thenApply will be skipped, and the CompletableFuture is considered to have completed exceptionally.
If necessary, the caller can handle the failure by chaining an exceptionally call onto the CompletableFuture it receives.
Search command
With the network component in place, the search command can now be implemented.
When a search command is entered, a SearchCommand object will be created if the parsing of the command was successful,
which will make a call to searchBooks on the Network API, as shown in the sequence diagram below:
As described in Section 4.1.1.1, “Network component”, when the event is handled by NetworkManager, this will result in an asynchronous HTTP request being made to Google Books API.
Once the request and the parsing of the response completes successfully, the operation added by the thenAccept call in SearchCommand will be executed.
This results in the execution of the following method in SearchCommand:
    private void displaySearchResults(ReadOnlyBookShelf bookShelf) {
        model.updateSearchResults(bookShelf);
        model.setActiveListType(ActiveListType.SEARCH_RESULTS);
        EventsCenter.getInstance().post(new ActiveListChangedEvent());
        EventsCenter.getInstance().post(new NewResultAvailableEvent(
                String.format(SearchCommand.MESSAGE_SEARCH_SUCCESS, bookShelf.size())));
        EventsCenter.getInstance().post(new EnableCommandBoxRequestEvent());
    }
The above method is run on the JavaFX thread (using Platform#runLater) because it will result in updates to the book list panel.
If such updates are not done on the JavaFX thread, JavaFX will throw an IllegalStateException.
|
4.1.2. Design Considerations
Aspect: Asynchronous vs synchronous
-
Alternative 1 (current choice): HTTP requests are made asynchronously.
-
Pros: The application will be more responsive, as potentially long-running HTTP requests will not block the application thread.
-
Cons: Not straightforward to implement, especially considering that changes to the UI have to be made on the JavaFX application thread.
-
-
Alternative 2: HTTP requests are made synchronously (on the JavaFX application thread).
-
Pros: More straightforward to implement, as well as to understand the implementation.
-
Cons: The UI will be unresponsive for the duration of the HTTP requests, and this can degrade the user experience.
-
Aspect: Design of network API
-
Alternative 1 (current choice): Call methods on the
NetworkAPI directly, which returnCompletableFutureobjects.-
Pros: More explicit flow of data, making it easier to understand and debug.
-
Cons: Since web API calls are made by certain commands, the
NetworkManagerwill have to be passed fromMainAppall the way into eachCommand.
-
-
Alternative 2: Use events to request for web API calls and retrieve the results.
-
Pros: Less coupling - no component will be directly depending on the network component.
-
Cons: The flow of data can become less explicit and clear, and it becomes more complicated to use a single web API call for multiple purposes.
-
Aspect: Converting JSON responses to model types
-
Alternative 1 (current choice): Convert to a temporary data holder before converting to model type.
-
Pros: Easier and more straightforward implementation - a large part of the conversion work is done by the Jackson library.
-
Cons: Slower and less efficient - due to the double conversion and the use of the Reflection API (in the Jackson library).
-
-
Alternative 2: Convert parsed JSON directly to model type.
-
Pros: Faster and more efficient.
-
Cons: Code will be more complicated and tedious - we will need to traverse through the JSON node tree manually.
-
4.2. Undo previous command
The undo command allows the user to undo a previous command that caused changes to the book shelf.
This allows the user to easily reverse their actions.
4.2.1. Current Implementation
The undo mechanism is facilitated by an UndoStack, which resides inside LogicManager. It supports undoing of commands that modifies the state of the book shelf (e.g. add, edit). Such commands will inherit from UndoableCommand.
UndoStack only deals with UndoableCommands. Commands that cannot be undone will inherit from Command instead. The following diagram shows the inheritance diagram for commands:
As you can see from the diagram, UndoableCommand adds an extra layer between the abstract Command class and concrete commands that can be undone, such as the DeleteCommand. Note that extra tasks need to be done when executing a command in an undo-able way, such as saving the state of the book shelf before execution. UndoableCommand contains the high-level algorithm for those extra tasks while the child classes implements the details of how to execute the specific command. Note that this technique of putting the high-level algorithm in the parent class and lower-level steps of the algorithm in child classes is also known as the template pattern.
Commands that are not undoable are implemented this way:
public class ListCommand extends Command {
    @Override
    public CommandResult execute() {
        // ... list logic ...
    }
}
With the extra layer, the commands that are undoable are implemented this way:
public abstract class UndoableCommand extends Command {
@Override
public CommandResult execute() {
// ... undo logic ...
executeUndoableCommand();
}
}
public class DeleteCommand extends UndoableCommand {
@Override
public CommandResult executeUndoableCommand() {
// ... delete logic ...
}
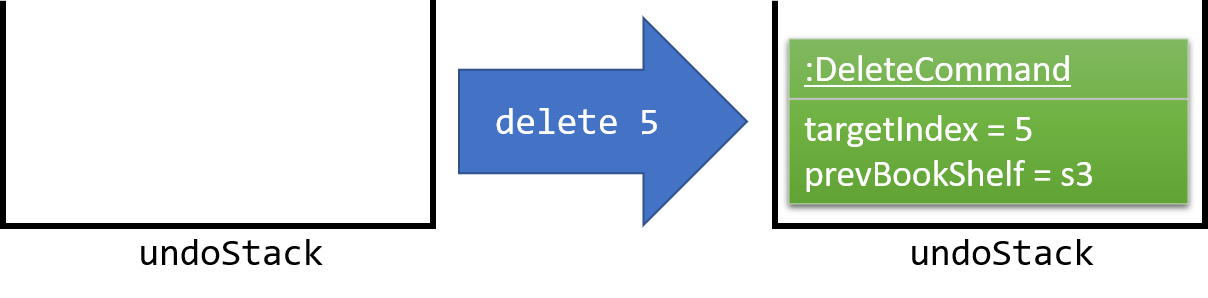
}Suppose that the user has just launched the application. The UndoStack will be empty at the beginning.
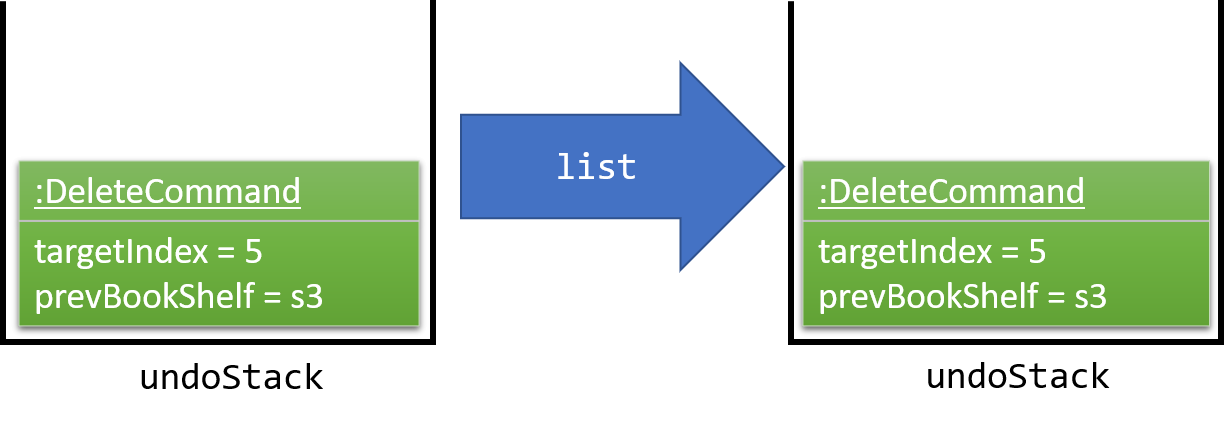
The user executes a new UndoableCommand, delete 5, to delete the 5th book in the book shelf. The current state of the book shelf is saved before the delete 5 command executes. The delete 5 command will then be pushed onto the undoStack (the current state is saved together with the command).
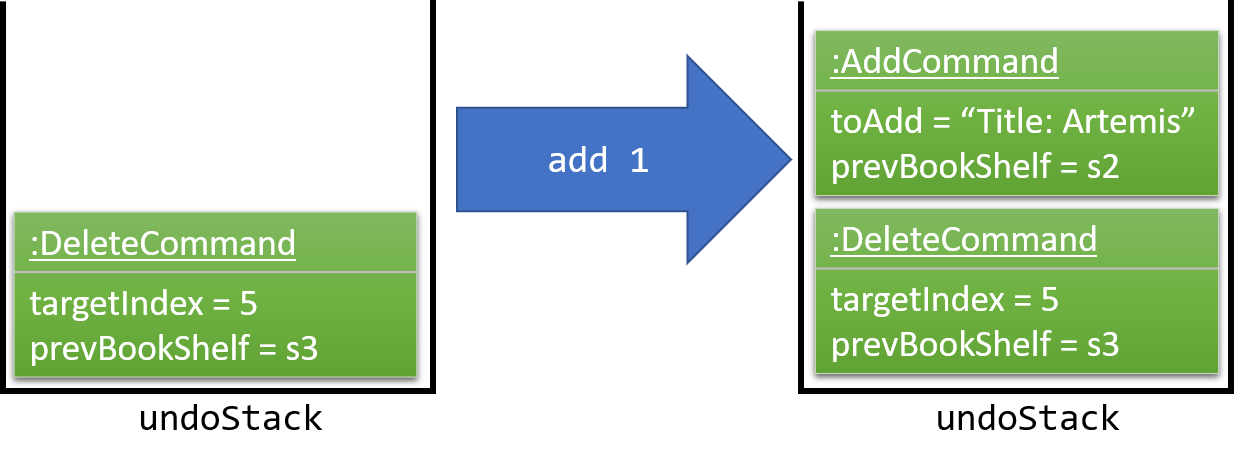
As the user continues to use the program, more commands are added into the undoStack. For example, the user may execute add 1 to add a new book.
If a command fails its execution, it will not be pushed to the UndoStack at all.
|
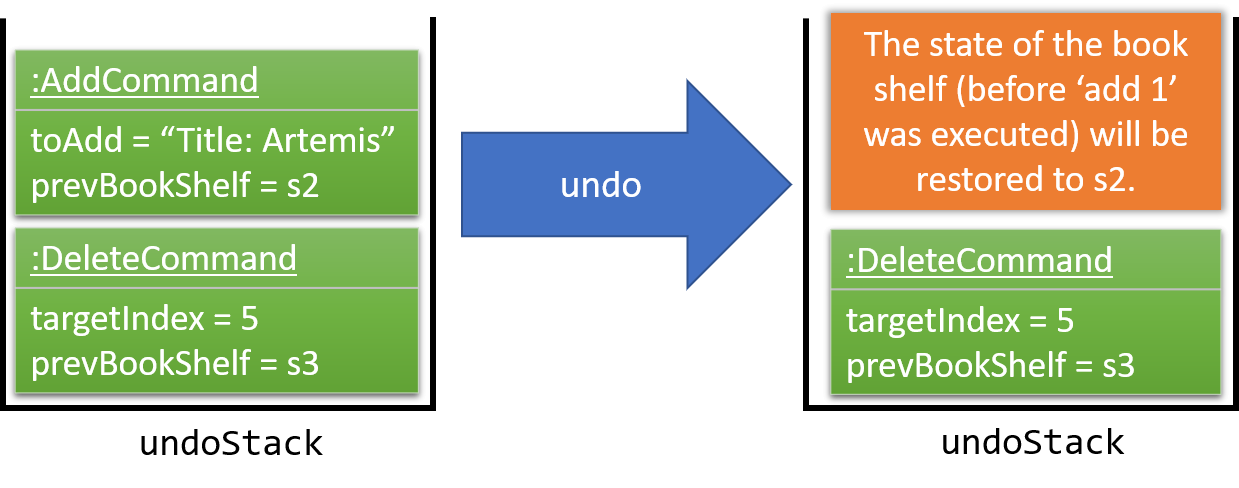
The user now decides that adding the book was a mistake, and decides to undo that action using undo.
We will pop the most recent command out of the undoStack. We will restore the book shelf to the state before the add command executed.
If the undoStack is empty, then there are no other commands left to be undone, and an Exception will be thrown when popping the undoStack.
|
The following sequence diagram shows how the undo operation works:
Commands that are not undoable are not added into the undoStack. For example, list, which inherits from Command rather than UndoableCommand, will not be added after execution:
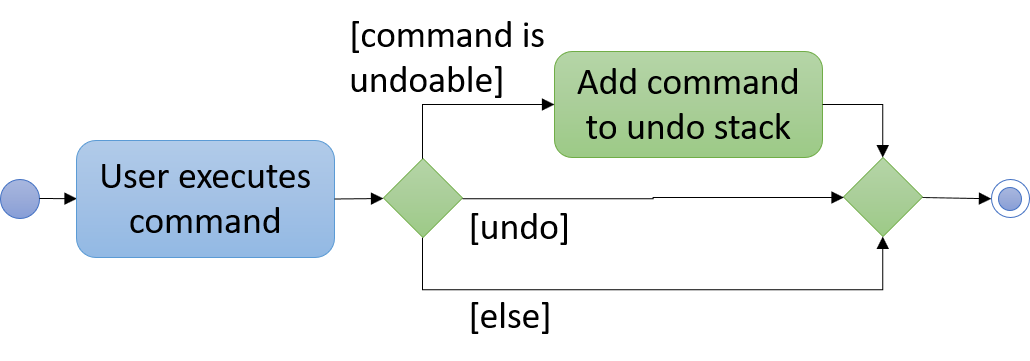
The following activity diagram summarize what happens inside the UndoStack when a user executes a new command:
4.2.2. Design Considerations
Aspect: Implementation of UndoableCommand
-
Alternative 1 (current choice): Add a new abstract method
executeUndoableCommand()-
Pros: We will not lose any undone/redone functionality as it is now part of the default behaviour. Classes that deal with
Commanddo not have to know thatexecuteUndoableCommand()exist. -
Cons: Hard for new developers to understand the template pattern.
-
-
Alternative 2: Just override
execute()-
Pros: Does not involve the template pattern, easier for new developers to understand.
-
Cons: Classes that inherit from
UndoableCommandmust remember to callsuper.execute(), or lose the ability to undo/redo.
-
Aspect: How undo executes
-
Alternative 1 (current choice): Individual command knows how to undo by itself.
-
Pros: Will use less memory (e.g. for
delete, just save the book being deleted). -
Cons: We must ensure that the implementation of each individual command are correct.
-
-
Alternative 2: Saves the entire book shelf.
-
Pros: Easy to implement.
-
Cons: May have performance issues in terms of memory usage.
-
Aspect: Type of commands that can be undone
-
Alternative 1 (current choice): Only include commands that modifies the book fetch (
add,clear,edit).-
Pros: We only revert changes that are hard to change back (the view can easily be re-modified as no data are lost).
-
Cons: User might think that undo also applies when the view is modified (for example
search), only to realize that it does not do that, after executingundo.
-
-
Alternative 2: Include all commands.
-
Pros: Might be more intuitive for the user.
-
Cons: User have no way of skipping such commands if he or she just want to reset the state of the book shelf and not the view. Additional Info: See the discussion here.
-
4.3. Edit status, priority, and rating of books
The edit command allows the user to change the priority, status and rating of books in his/her book shelf to facilitate organization and management of books.
4.3.1. Current implementation
When edit command is entered,
-
EditCommandParserwill extract the index and the parameters from the user input. -
EditCommandParserchecks that at least one parameter is present, and that the parameter(s) are valid. -
EditCommandParsercreates anEditCommandwith the index and parameter(s). -
EditCommandis preprocessed to check thatActiveListTypeis correct and index is valid. -
The
Bookto edit (bookToEdit) is identified by the index. AnotherBook(editedBook) is created based on the specified parameters. -
editedBookreplacesbookToEditinBookShelf.
Sequence Diagram
4.3.2. Design considerations
Aspect: Presentation of rating
-
Alternative 1: Show users the rating as a number.
-
Pros: Easy to implement.
-
Cons: Not aesthetically appealing.
-
-
Alternative 2 (current choice): Show users the rating as stars.
-
Pros: Difficult to implement.
-
Cons: Improves the aesthetic appeal and clarity.
-
Aspect: Interpretation of unspecified parameters
-
Alternative 1 (current choice): Unspecified parameters are left unchanged.
-
Pros: Users can omit parameters that they do not wish to change.
-
Cons: More difficult to implement.
-
-
Alternative 2: Unspecified parameters are set to default value.
-
Pros: Easy to implement.
-
Cons: Users need to specify all parameters to change one.
-
4.4. View recently selected books
The recent command allows the user to view books that he/she recently selected.
This allows the user to easily look back for a particular book, and to add it into his/her book shelf without having to perform a search again.
4.4.1. Current implementation
Recently selected books are stored in a UniqueBookCircularList which resides in ModelManager.
Model exposes a method addRecentBook(Book) to add new book selections. Whenever a new book is selected, LogicManager handles the BookListSelectionChangedEvent and adds the book into the list using addRecentBook(Book).
When recent is entered, it will be parsed into a RecentCommand, which when executed, sets the ActiveListType to RECENT_BOOKS.
It then posts ActiveListChangedEvent to the EventCenter to signal this change. The interaction between components is shown in the diagram below.
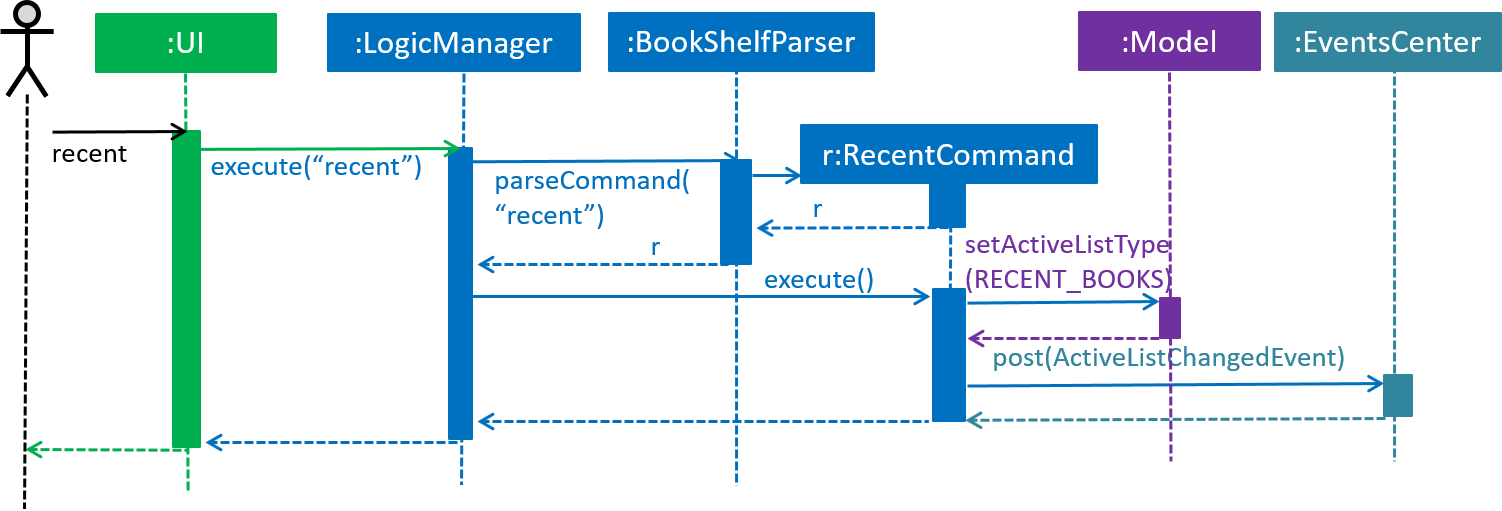
ActiveListType is needed because the commands that users can perform on different lists differ. For example, users cannot delete books if the ActiveListType is RECENT_BOOKS.
|
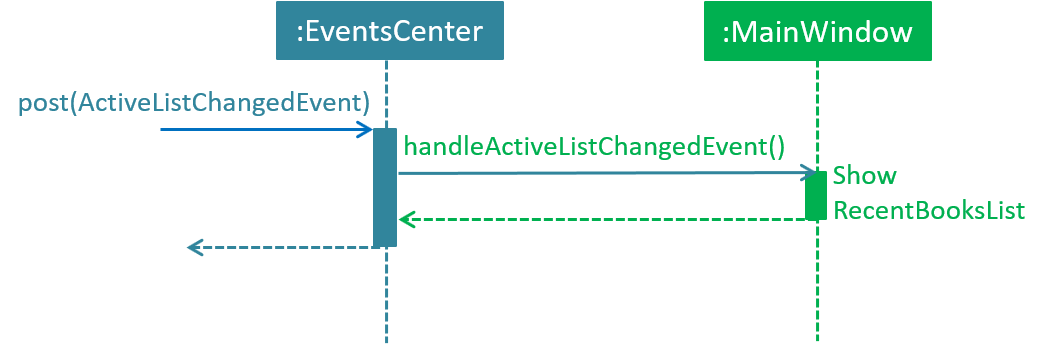
ActiveListChangedEvent is handled by MainWindow, which updates the list displayed in BookListPanel.
UniqueBookCircularList has size 50 by default. For illustration purposes, assume we have a
UniqueBookCircularList of size 2 that is empty at the start. ActiveListType is BOOK_SHELF.
The user performs select 1 to view information on the 1st book in the book shelf. The
selected book is added onto the UniqueBookCircularList.
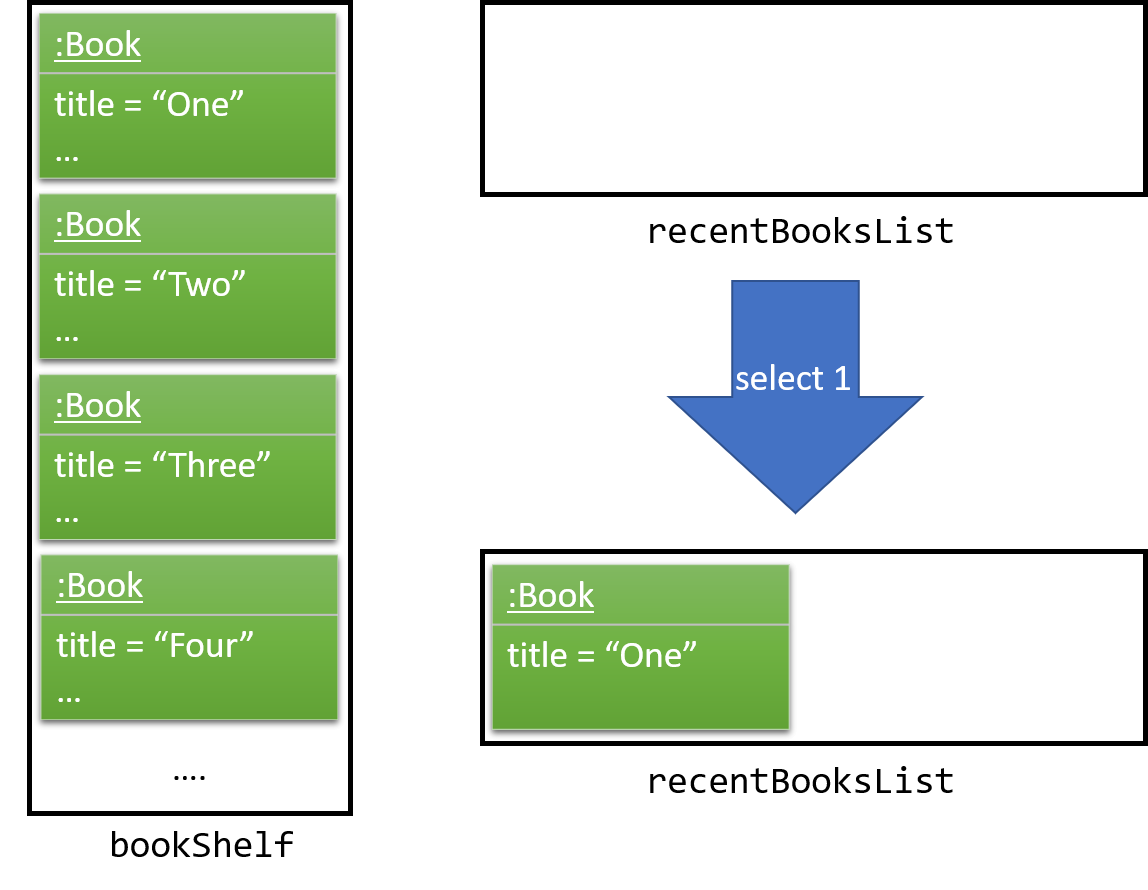
| If select fails to execute (eg. given index is invalid), the list will remain unchanged. |
The user then selects another book with select 2. The book is added to the front of the UniqueBookCircularList.
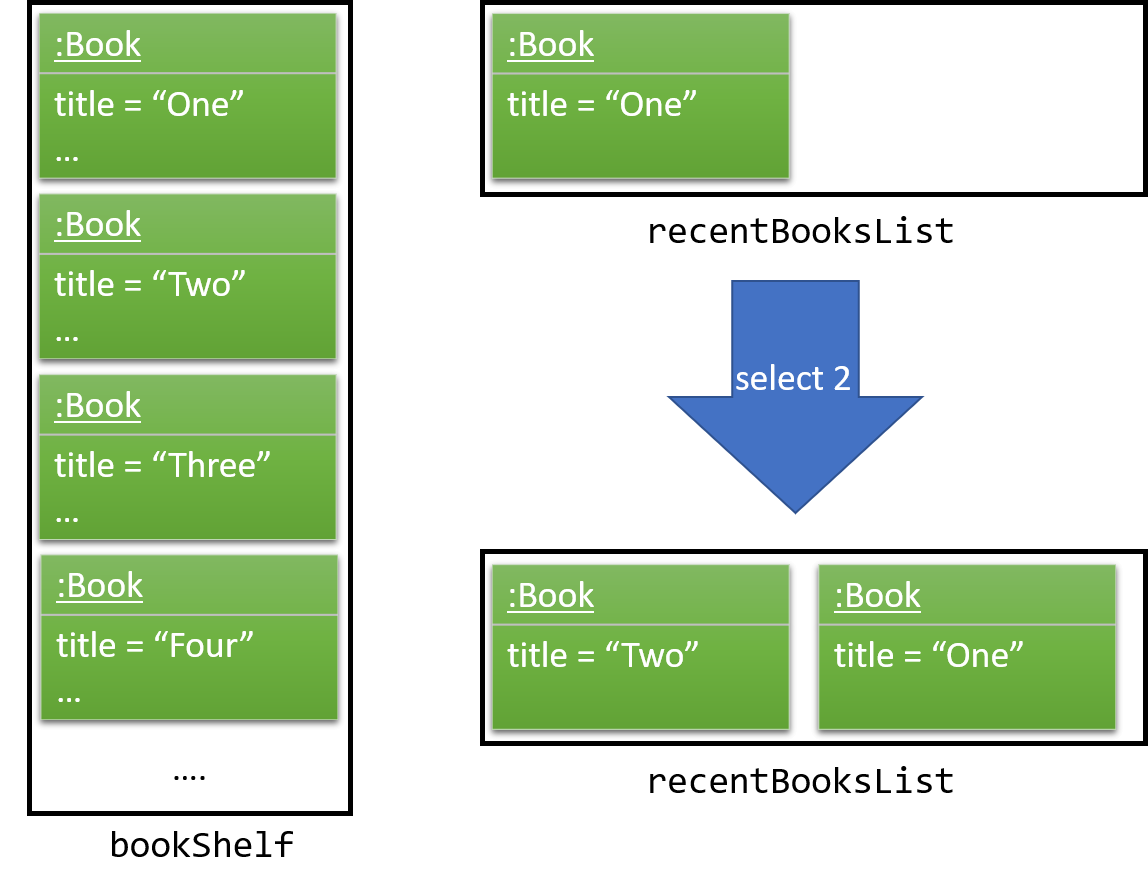
Selecting a book directly from the UI (without using select command) will also update the list according.
|
Now if the user performs select 1 again, the book One, which already exists in the list, will be removed
from the list and added again so that it is in the first index of the list (most recently selected).

Note that the UniqueBookCircularList is currently full. When user performs select 3, since
Three is not in the list, the book at the last index (the least recent selection) is removed to make space for Three (Two in this case).
UniqueBookCircularList::equals is order sensitive since the order determines the recency.
|
When Bibliotek is exited, the data in the UniqueBookCircularList is stored in the format
of BookShelf. This data is read and converted to UniqueBookCircularList upon opening Bibliotek.
4.4.2. Design considerations
Aspect: Type of selected books that are shown
-
Alternative 1 (current choice): All books selected from the user’s book shelf or search results.
-
Pros: More intuitive for the user.
-
Cons: Users can easily find books in his book shelf. Including these books in
recentlist may not be useful and take up space.
-
-
Alternative 2: Only books selected from the user’s search results.
-
Pros: Users are more likely to need
recentto find these books. We can reduce clutter by only showing these books. -
Cons: Less intuitive for the user. We also need to deal with books that are added or deleted after selection.
-
Aspect: Data structure to hold the recently selected books data
-
Alternative 1 (current choice): Make a new type of book list
UniqueBookCircularList.-
Pros: Can make the size limit and add mechanism a property of the new list.
-
Cons: Have to deal with multiple data structures to hold data for different purposes.
-
-
Alternative 2: Use
BookShelf.-
Pros: Re-use of existing data structure.
-
Cons:
BookShelfsupports functionalities that are not needed to store recently selected books.
-
4.5. Check for availability of book in NLB library
The library command allows the user to easily check for the availability of books in NLB libraries.
This eliminates the need to manually enter search information into the NLB catalogue. The user can use this information to decide when or whether to read a book.
4.5.1. Current implementation
When a library command is entered, a LibraryCommand will be created if the parsing of the command was successful, which will
make a call to searchLibraryForBook(Book) on the Network API. This will result in an asynchronous HTTP request being made to
NLB Catalogue.
Once the HTTP request completes, the operations in the .thenApply(…), shown in the code block below, will execute.
    private CompletableFuture<String> execute(String url, Book book) {
        return httpClient
                .makeGetRequest(url)
                .thenApply(NlbCatalogueApi::requireHtmlContentType)
                .thenApply(NlbCatalogueApi::requireHttpStatusOk)
                .thenApply(HttpResponse::getResponseBody)
                .thenApply(result -> NlbResultHelper.getUrl(result, book));
    }
This is summarized by the following activity diagram:
The CompletableFuture completes exceptionally if the content type or status code is wrong.
Else, a URL of the page showing availability of the target book, if any, is obtained.
This depends on the response HTML, which can be categorized into the following:
-
Full display (the page we want): The URL which the HTTP GET request was made to is returned.
-
Non-empty list of results: The URL of the top result is returned.
-
Empty list of results: A custom message, reporting that no result is found, is returned.
Once the necessary result is obtained, the following method in LibraryCommand is executed:
    private void onSuccessfulRequest(String result, Book book) {
        EventsCenter.getInstance().post(new ShowLibraryResultRequestEvent(result));
        EventsCenter.getInstance().post(new NewResultAvailableEvent(String.format(MESSAGE_SUCCESS, book)));
    }
ShowLibraryResultRequestEvent is handled by MainWindow and BookInLibraryPanel to load the URL using a WebView and display the webpage.
The loaded page is post-processed using a script to show only the relevant section.
4.5.2. Design considerations
Aspect: How to show availability of the book
-
Alternative 1 (current choice): Load the webpage using a
WebView.-
Pros: Immune to changes in structure of that webpage.
-
Cons: Lesser flexibility in structure and content. Also subject to limitations of
WebView.
-
-
Alternative 2: Extract the relevant information from the HTTP response and design a new panel to show the results.
-
Pros: Greater control over structure and content.
-
Cons: Vulnerable to changes in structure of that webpage.
-
Aspect: Using advanced search versus basic search
-
Alternative 1 (current choice): Perform basic search, which uses a HTTP GET request.
-
Pros: Faster response time.
-
Cons: Searched keyword seems to be matched to title or authors only.
-
-
Alternative 2: Perform advanced search, which uses a HTTP POST request.
-
Pros: Able to limit the search results using more parameters such as publication year or ISBN.
-
Cons: Slower response time.
-
Aspect: Whether to load in WebView directly or pre-process through Network component
-
Alternative 1 (current choice): Pre-process HTTP response in
Networkcomponent, then send intended URL toWebView.-
Pros: Processing happens behind the scene, and does not distract the user.
-
Cons: User is subject to waiting times without feedback on progress. Furthermore, the control flow becomes more complicated since a URL still needs to be passed to and loaded on the
WebVieweventually.
-
-
Alternative 2: Load search URL in
WebViewand navigate to intended page using script.-
Pros: Easier to implement. Eliminate the need to modify
Networkcomponent. -
Cons: User will be able to see the navigation between pages.
-
4.6. Command aliasing
The command aliasing system allows the user to specify short command aliases to use in place of the original commands. This improves the user experience by reducing the amount of typing the user needs to do.
4.6.1. Current Implementation
The user can customize their command aliases using the addalias and deletealias commands.
These commands allow the user to add and delete aliases respectively.
Adding command aliases
When the user attempts to add a new command alias using addalias ALIAS_NAME cmd/COMMAND, the user input will first be
validated and pre-processed by AddAliasCommandParser.
AddAliasCommandParser verifies that both the ALIAS_NAME and COMMAND are non-empty, before
searching the COMMAND for the first occurrence of an empty space that is followed by a named command parameter.
Using this point, the parser will split the COMMAND into two parts - the prefix, and the named arguments.
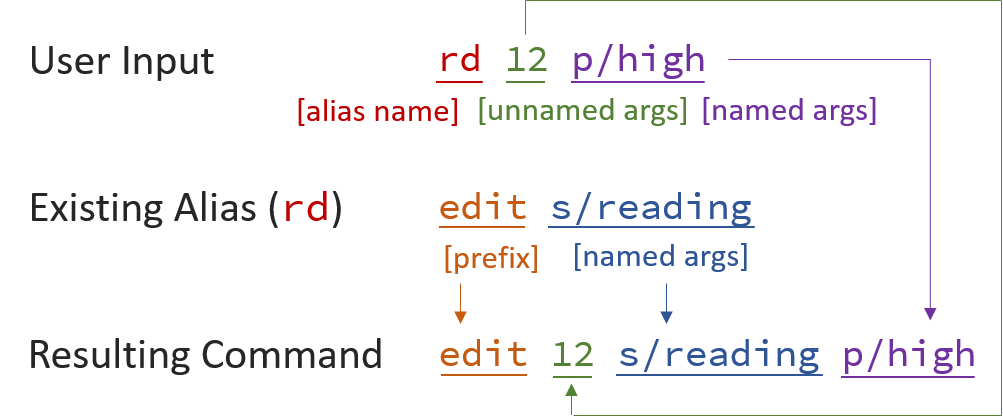
The figure below shows an example for the edit 12 s/reading p/high command.
The searching and splitting is accomplished using the following regular expression.
private static final Pattern COMMAND_FORMAT = Pattern.compile("(?<prefix>((?! \\w+\\/.*)[\\S ])+)(?<namedArgs>.*)");Following this pre-processing step, a new Alias will be created using the alias name, command prefix, and named arguments.
    private static Alias createAlias(String aliasName, Matcher commandMatcher) {
        return new Alias(aliasName, commandMatcher.group("prefix"), commandMatcher.group("namedArgs"));
    }
The Alias is then added to the UniqueAliasList in ModelManager, and this update will cause an AliasListChangedEvent to be posted.
The event is handled by StorageManager, which saves the updated alias list to data/aliaslist.xml.
| There are currently no checks in place to prevent the user from adding a command alias that refers to an invalid or non-existent built-in command. |
Using command aliases
The user can use command aliases in the same way they use normal commands. In this section, we assume that the user added rd as an alias for edit s/reading.
Whenever a command is entered into the command box, the command will be passed by LogicManager into BookShelfParser#applyCommandAlias,
where an attempt will be made to apply a matching command alias.
The application of a command alias begins by splitting the input into three parts - the alias name (first word in the input), unnamed arguments, and named arguments.
The figure below shows an example for the rd 12 p/high command.
This splitting is accomplished using the following regular expression.
    private static final Pattern ALIASED_COMMAND_FORMAT =
            Pattern.compile(" *(?<aliasName>\\S+)(?<unnamedArgs>((?! [\\w]+\\/.*)[\\S ])*)(?<namedArgs>.*)");
If the alias name matches that of an existing alias, then the alias will be applied.
Otherwise, the input will be returned unchanged. In this case, the alias named rd will be applied.
The result of the application of the alias is a new command that is formed by splicing parts of the user input into the aliased command.
Using rd 12 p/high as the user input, this process is demonstrated in the figure below.
The resulting command, edit 12 s/reading p/high, will then be parsed and executed, instead of the original user input.
4.6.2. Design Considerations
Aspect: Inclusion of command parameters in aliases
-
Alternative 1 (current choice): Allow aliasing of command parameters, together with the command word.
-
Pros: Increases the usefulness of the command aliasing system.
-
Cons: Less straightforward to implement, especially considering that some commands may require an index that comes before the named parameters.
-
-
Alternative 2: Only allow command words to be aliased.
-
Pros: More straightforward to implement.
-
Cons: Limits the usefulness of the command aliasing system, especially for users who may need to use certain commands that contain parameters regularly, e.g.
list s/high by/status.
-
4.7. Encrypt data
This allows the user to protect his book shelf data with a password so that others cannot gain access to these data.
4.7.1. Current implementation
Encrypt the Bookshelf.xml
An addition class CipherEngine is added to the Bookshelf class. This class contatins some methods
to encrypt or decrypt file(Bookshelf.xml)and password.
Note that when 'CipherEngine' encrypt the file, it will use the (encryped)password.
-
Every time user make change in
Bookshelf-
The
model managerwill post anBookshelfChangedEvent. -
Before saving the data into
Bookshelf.xml, the system will check whetherBookshelfis protected by thepassword(checking whether thepasswordisdefaultpassword: ""). -
When the
passwordis not default, theBookshelf.xmlwill be encrypted.
-
-
Every time user set the new
password-
The
Setpwcommandwill check thepassword. -
If the new
passwordis equal to "", theLockmanagerwill setisProtectedto be false. -
The isProtect will be checked by
xmlBookshelfstoragewhether to encrypt the "Bookshelf.xml" and save the data intoBookshelf.xml.
-
-
When the system need to be encrypt
-
The
passwordwill be encode, and set it to be a key to encrypt the file(Bookshelf.xml).
-
Lock the book shelf
An addition class LockManager is added to save the password and the situation of the locking system.
The default password provided for the new user is defaultpassword(""), which means that the Bookshelf is not locked.
-
When
Lockcommand is entered-
LockCommandis processed to setisLock(LockManager) to be true.
-
. The Bookshelf cannot be run any command except unlock and help command.
|
-
When the
Bookshelfis locked andunlockcommand is entered-
UnlockCommandParserwill extractpasswordfrom the user input. -
UnlockCommandParsercreates anUnlockCommandfor thepassword. -
UnlockCommandis preprocessed to execute `LockManager’s unlock(password). -
If the password is corrct, the unlock will be run successfully, otherwise it will send a WRONG_PASSWORD commandresult.
-
UnlockCommandis processed to set isLock(LockManager) to be false.
-
-
When
setpwcommand is entered-
setpasswordCommandParserwill extract the old key and new key from the user input. -
setpwParserchecks that two parameters are valid. -
setpasswordCommandParsercreates ansetpwCommandwith the parameters. -
setpwCommandis preprocessed to check that oldKey is correct usingLockManager. -
If the oldKey is correct,
setpwCommandwill post apasswordChangedevent. -
MainApp will handle it, and set
UserPrefs.passwordto be new encodedpassword(using cipherEngine).
-
-
The encode key are implement in this way: [source,java]
    public static String encrypKey(String mykey) throws Exception {
        byte[] byarray = encrypt(mykey.getBytes(ENCODE), defaultKey.getBytes(ENCODE));
        String encryptkey = new BASE64Encoder().encode(byarray);
        return encryptkey;
    }

    public static byte[] encrypt(byte[] mykey, byte[] key) throws Exception {
        SecureRandom secureRandom = new SecureRandom();

        DESKeySpec desKeySpec = new DESKeySpec(key);

        SecretKeyFactory secretKeyFactory = SecretKeyFactory.getInstance(DES);
        SecretKey securekey = secretKeyFactory.generateSecret(desKeySpec);

        Cipher cipher = Cipher.getInstance(DES);

        cipher.init(Cipher.ENCRYPT_MODE, securekey, secureRandom);

        return cipher.doFinal(mykey);
    }
-
The encode key are implement in this way:
    public static String decryptKey(String yourkey) throws IOException, Exception {
        if (yourkey == null) {
            return null;
        }
        BASE64Decoder base64Decoder = new BASE64Decoder();
        byte[] decodeBuffer = base64Decoder.decodeBuffer(yourkey);
        byte[] bytes = decrypt(decodeBuffer, defaultKey.getBytes(ENCODE));
        return new String(bytes, ENCODE);
    }

    private static byte[] decrypt(byte[] yourkey, byte[] key) throws Exception {

        SecureRandom secureRandom = new SecureRandom();

        DESKeySpec desKeySpec = new DESKeySpec(key);

        SecretKeyFactory secretKeyFactory = SecretKeyFactory.getInstance(DES);
        SecretKey securekey = secretKeyFactory.generateSecret(desKeySpec);

        Cipher cipher = Cipher.getInstance(DES);

        cipher.init(Cipher.DECRYPT_MODE, securekey, secureRandom);

        return cipher.doFinal(yourkey);
    }
4.7.2. Design considerations
Aspect: Whether to use three commands instead of only one
-
Alternative 1 (current choice): Use three commands to do the lock, unlock and setpassword actions.
-
Pros: Users can clearly know what they can do about the password.
-
Cons: Users should learn two more commands.
-
-
Alternative 2: Use only one
setpwcommand to solve all three features.-
Pros: Seem that users can eliminate the typing.
-
Cons: Users will feel confuse, not so clear about the command.
-
Aspect: Whether to encode the password before store it
-
Alternative 1 (current choice): Stores the encoded password.
-
Pros: Others cannot know users' passwords easily.
-
Cons: Difficult to implement.
-
-
Alternative 2: Store the text form password.
-
Pros: Easy to implement.
-
Cons: Others can know users' passwords easily.
-
4.8. Logging
We are using java.util.logging package for logging. The LogsCenter class is used to manage the logging levels and logging destinations.
-
The logging level can be controlled using the
logLevelsetting in the configuration file (See Section 4.9, “Configuration”). -
The
Loggerfor a class can be obtained usingLogsCenter.getLogger(Class)which will log messages according to the specified logging level. -
Currently log messages are output through
Consoleand to a.logfile.
Below are the different logging levels and descriptions of when each level should be used.
-
SEVERE: Critical problem detected which may possibly cause the termination of the application. -
WARNING: Can continue, but with caution. -
INFO: Information showing the noteworthy actions by the App. -
FINE: Details that is not usually noteworthy but may be useful in debugging e.g. print the actual list instead of just its size.
5. Documentation
We use asciidoc for writing documentation.
| We chose asciidoc over Markdown because asciidoc, although a bit more complex than Markdown, provides more flexibility in formatting. |
5.1. Editing Documentation
See UsingGradle.adoc to learn how to render .adoc files locally to preview the end result of your edits.
Alternatively, you can download the AsciiDoc plugin for IntelliJ, which allows you to preview the changes you have made to your .adoc files in real-time.
5.2. Publishing Documentation
See UsingTravis.adoc to learn how to deploy GitHub Pages using Travis.
5.3. Converting Documentation to PDF format
We use Google Chrome for converting documentation to PDF format, as Chrome’s PDF engine preserves hyperlinks used in webpages.
Here are the steps to convert the project documentation files to PDF format.
-
Follow the instructions in UsingGradle.adoc to convert the AsciiDoc files in the
docs/directory to HTML format. -
Go to your generated HTML files in the
build/docsfolder, right click on them and selectOpen with→Google Chrome. -
Within Chrome, click on the
Printoption in Chrome’s menu. You should see a pop-up similar to Figure 12 below. -
Set the destination to
Save as PDF, then clickSaveto save a copy of the file in PDF format. For best results, follow the settings as indicated in Figure 12.

6. Testing
This section includes some information that may be useful for testing the project.
6.1. Running Tests
There are three ways to run tests.
| The most reliable way to run tests is the 3rd one. The first two methods might fail some GUI tests due to platform/resolution-specific idiosyncrasies. |
Method 1: Using IntelliJ JUnit test runner
-
To run all tests, right-click on the
src/test/javafolder and chooseRun 'All Tests'. -
To run a subset of tests, you can right-click on a test package, test class, or a test and choose
Run 'ABC'.
Method 2: Using Gradle
-
Open a console and run the command
gradlew clean allTests(Mac/Linux:./gradlew clean allTests).
| See UsingGradle.adoc for more info on how to run tests using Gradle. |
Method 3: Using Gradle (headless)
Thanks to the TestFX library we use, our GUI tests can be run in the headless mode. In the headless mode, GUI tests do not show up on the screen. That means the developer can do other things on the Computer while the tests are running.
To run tests in headless mode, open a console and run the command gradlew clean headless allTests (Mac/Linux: ./gradlew clean headless allTests).
6.2. Types of tests
We have two types of tests:
-
GUI Tests - These are tests involving the GUI. They include:
-
System Tests that test the entire App by simulating user actions on the GUI. These are in the
systemtestspackage. -
Unit tests that test the individual components. These are in
seedu.address.uipackage.
-
-
Non-GUI Tests - These are tests not involving the GUI. They include:
-
Unit tests targeting the lowest level methods/classes.
e.g.seedu.address.commons.StringUtilTest -
Integration tests that are checking the integration of multiple code units (those code units are assumed to be working).
e.g.seedu.address.storage.StorageManagerTest -
Hybrids of unit and integration tests. These test are checking multiple code units as well as how the are connected together.
e.g.seedu.address.logic.LogicManagerTest
-
6.3. Troubleshooting Testing
Problem: HelpWindowTest fails with a NullPointerException.
-
Reason: One of its dependencies,
UserGuide.htmlinsrc/main/resources/docsis missing. -
Solution: Execute Gradle task
processResources.
Problem: AddCommandSystemTest or SearchCommandSystemTest fails with a GuiRobot$EventTimeoutException.
-
Reason: The required data could not be fetched from the online service within 10s. The service could be down at the moment.
-
Solution: Check that you are connected to the Internet, or if you are, try again later.
7. Dev Ops
This section contains some information or tools that may be useful for managing the project.
7.1. Build Automation
See UsingGradle.adoc to learn how to use Gradle for build automation.
7.2. Continuous Integration
We use CircleCI, Travis CI, and AppVeyor to perform Continuous Integration on our projects. See UsingCircleCI.adoc, UsingTravis.adoc, and UsingAppVeyor.adoc for more details.
7.3. Coverage Reporting
We use Coveralls to track the code coverage of our projects. See UsingCoveralls.adoc for more details.
7.4. Documentation Previews
When a pull request has changes to asciidoc files, you can use Netlify to see a preview of how the HTML version of those asciidoc files will look like when the pull request is merged. See UsingNetlify.adoc for more details.
7.5. Making a Release
Here are the steps to create a new release.
-
Update the version number in
MainApp.java. -
Generate a JAR file using Gradle.
-
Tag the repo with the version number, e.g.
v0.1. -
Create a new release using GitHub and upload the JAR file you created.
7.6. Managing Dependencies
A project often depends on third-party libraries. For example, Bibliotek depends on the Jackson library for XML parsing. We make use of Gradle to manage the project dependencies. Gradle can automate the downloading of these dependencies, saving us time and effort.
While strongly discouraged by us, you can nevertheless opt for one of the following alternatives.
-
Include those libraries in the repo (though this bloats the repo size).
-
Download those libraries manually (though this creates extra work for you).
Appendix A: Suggested Programming Tasks to Get Started
Suggested path for new programmers:
-
First, add small local-impact (i.e. the impact of the change does not go beyond the component) enhancements to one component at a time. Some suggestions are given in Section A.1, “Improving each component”.
-
Next, add a feature that touches multiple components to learn how to implement an end-to-end feature across all components. Section A.2, “Creating a new command:
remark” explains how to go about adding such a feature.
A.1. Improving each component
Each individual exercise in this section is component-based (i.e. you would not need to modify the other components to get it to work).
Logic component
Scenario: You are in charge of logic. During dog-fooding, your team realize that it is troublesome for a new user, who has not set up any custom aliases yet, to type the whole command in order to execute a command. Your team devise some strategies to help cut down the amount of typing necessary, and one of the suggestions was to implement aliases for the command words. Your job is to implement such aliases.
Do take a look at Section 3.3, “Logic component” before attempting to modify the Logic component.
|
-
Add a shorthand equivalent alias for each of the individual commands. For example, besides typing
clear, the user can also typecto remove all books in the list.
Model component
Scenario: You are in charge of model. One day, the logic-in-charge approaches you for help. He wants to implement a command such that the user is able to remove all custom aliases for a certain command, but the model API does not support such a functionality at the moment. Your job is to implement an API method, so that your teammate can use your API to implement his command.
Do take a look at Section 3.4, “Model component” before attempting to modify the Model component.
|
-
Add a
removeAliasForCommand(String)method. All aliases for the specified command will be removed from the alias list.
Ui component
Scenario: You are in charge of ui. During a beta testing session, your team is observing how users use Bibliotek. You realize that one user made a typing mistake in his command, but did not realize he had done so because the error message wasn’t prominent enough. A second user keeps scrolling down the list, because he keeps forgetting the index of the last book in the list. Your job is to implement improvements to the UI to solve these problems.
Do take a look at Section 3.2, “UI component” before attempting to modify the UI component.
|
-
Modify
NewResultAvailableEventsuch thatResultDisplaycan show a different style on error (currently it shows the same regardless of errors).Before
After
-
Modify the
StatusBarFooterto show the total number of books in the book shelf.Before

After

Storage component
Scenario: You are in charge of storage. For your next project milestone, your team plans to implement a new feature of saving the book shelf to the cloud. However, the current implementation of the application constantly saves the book shelf after the execution of each command, which is not ideal if the user is working on limited internet connection. Your team decided that the application should instead save the changes to a temporary local backup file first, and only upload to the cloud after the user closes the application. Your job is to implement a backup API for the book shelf storage.
Do take a look at Section 3.5, “Storage component” before attempting to modify the Storage component.
|
-
Add a new method
backupBookShelf(ReadOnlyBookShelf), so that the book shelf can be saved in a fixed temporary location.
A.2. Creating a new command: remark
By creating this command, you will get a chance to learn how to implement a feature end-to-end, touching all major components of the app.
Scenario: You are a software maintainer for Bibliotek, as the former developer team has moved on to new projects. The current users of your application have a list of new feature requests that they hope the software will eventually have. The most popular request is to allow adding additional comments/notes about a particular book, by providing a flexible remark field for each book. After designing the specification for the remark command, you are convinced that this feature is worth implementing. Your job is to implement the remark command.
A.2.1. Description
Edits the remark for a book specified in the INDEX.
Format: remark INDEX r/[REMARK]
Examples:
-
remark 1 r/Recommended by YX.
Edits the remark for the first book toRecommended by YX. -
remark 1 r/
Removes the remark for the first book.
A.2.2. Step-by-step Instructions
[Step 1] Logic: Teach the app to accept 'remark' which does nothing
Let’s start by teaching the application how to parse a remark command. We will add the logic of remark later.
Main:
-
Add a
RemarkCommandthat extendsUndoableCommand. Upon execution, it should just throw anException. -
Modify
BookShelfParserto accept aRemarkCommand.
Tests:
-
Add
RemarkCommandTestthat tests thatexecuteUndoableCommand()throws an Exception. -
Add new test method to
BookShelfParserTest, which tests that typing "remark" returns an instance ofRemarkCommand.
[Step 2] Logic: Teach the app to accept 'remark' arguments
Let’s teach the application to parse arguments that our remark command will accept. E.g. 1 r/Recommended by YX.
Main:
-
Modify
RemarkCommandto take in anIndexandStringand print those two parameters as the error message. -
Add
RemarkCommandParserthat knows how to parse two arguments, one index and one with prefix 'r/'. -
Modify
BookShelfParserto use the newly implementedRemarkCommandParser.
Tests:
-
Modify
RemarkCommandTestto test theRemarkCommand#equals()method. -
Add
RemarkCommandParserTestthat tests different boundary values forRemarkCommandParser. -
Modify
BookShelfParserTestto test that the correct command is generated according to the user input.
[Step 3] Ui: Add a placeholder for remark in BookCard
Let’s add a placeholder on all our BookCard s to display a remark for each book later.
Main:
-
Add a
Labelwith any random text insideBookListCard.fxml. -
Add FXML annotation in
BookCardto tie the variable to the actual label.
Tests:
-
Modify
BookCardHandleso that future tests can read the contents of the remark label.
[Step 4] Model: Add Remark class
We have to properly encapsulate the remark in our Book class. Instead of just using a String, let’s follow the conventional class structure that the codebase already uses by adding a Remark class.
Main:
-
Add
Remarkto model component (you can copy fromDescriptionand change the names accordingly). -
Modify
RemarkCommandto now take in aRemarkinstead of aString.
Tests:
-
Add test for
Remark, to test theRemark#equals()method.
[Step 5] Model: Modify Book to support a Remark field
Now we have the Remark class, we need to actually use it inside Book.
Main:
-
Add
getRemark()inBook. -
You may assume that the user will not be able to use the
editcommand to modify the remarks field. -
Modify
SampleDataUtilto add remarks for the sample data (delete yourbookshelf.xmlso that the application will load the sample data when you launch it.)
[Step 6] Storage: Add Remark field to XmlAdaptedBook class
We now have Remark s for Book s, but they will be gone when we exit the application. Let’s modify XmlAdaptedBook to include a Remark field so that it will be saved.
Main:
-
Add a new Xml field for
Remark.
Tests:
-
Fix
invalidAndValidBookBookShelf.xml,typicalBooksBookShelf.xml,validBookShelf.xmletc., such that the XML tests will not fail due to a missing<remark>element.
[Step 6b] Test: Add withRemark() for BookBuilder
Since Book can now have a Remark, we should add a helper method to BookBuilder, so that users are able to create remarks when building a Book.
Tests:
-
Add a new method
withRemark()forBookBuilder. This method will create a newRemarkfor the book that it is currently building. -
Try and use the method on any sample
BookinTypicalBooks.
[Step 7] Ui: Connect Remark field to BookCard
Our remark label in BookCard is still a placeholder. Let’s bring it to life by binding it with the actual remark field.
Main:
-
Modify
BookCard's constructor to bind theRemarkfield to theBook's remark.
Tests:
-
Modify
GuiTestAssert#assertCardDisplaysBook(…)so that it will compare the now-functioning remark label.
[Step 8] Logic: Implement RemarkCommand#execute() logic
We now have everything set up… but we still can’t modify the remarks. Let’s finish it up by adding in actual logic for our remark command.
Main:
-
Replace the logic in
RemarkCommand#execute()(that currently just throws anException), with the actual logic to modify the remarks of a book.
Tests:
-
Update
RemarkCommandTestto test that theexecute()logic works.
A.2.3. Full Solution
See this PR for the step-by-step solution in the context of an address book application. Mapping the solution to the context of Bibliotek is left as an exercise.
Appendix B: Product Scope
Target user profile:
-
has a need to catalogue a significant number of books
-
prefer desktop apps over other types
-
can type fast
-
prefers typing over mouse input
-
is reasonably comfortable using CLI apps
Value proposition: manage books faster than a typical mouse/GUI driven app
B.1. Feature Contribution
Qiu Siyu
-
Search for books using Google Books API (major)
-
Added network component to support making asychronous HTTP requests.
-
Added
searchcommand to allow the user to search for books on Google Books. -
This allows the user to easily search for particular books, and add them without having to enter all the information manually (using the updated
addcommand).
-
-
Customize command aliases to use in place of full commands (minor)
-
Added
addalias,aliasesanddeletealiascommands to allow adding, viewing and deleting of aliases. -
Updated command parser to support command aliases.
-
Updated storage component to save command aliases in XML format.
-
This allows users to reduce the amount of typing needed.
-
Qiu Siqi
-
Search for books in the library (major)
-
Updated network component to support NLB catalogue.
-
Added
librarycommand to perform search in NLB catalogue. -
This allows the user to easily check the availability of books.
-
-
Get recently viewed books (minor)
-
Added a
recentcommand that allows user to view previous selections that he did not add into his book shelf. -
This allows the user to reconsider his choices without having to perform the search again.
-
Shi Jin
-
Mark a book as read, change the priority of a book and rate books (major)
-
Added
editcommand that allows user to rate, set status and change priority of some books. -
This allows the user to keep track of what to read and what have been read and give recommendations to others.
-
-
Encrypt data with a password (minor)
-
Add an
encryptcommand to encrypt data with a password. -
This allows users to keep their data private and safe.
-
Jianghao
-
Get command auto-completion suggestions (major)
-
Add auto-completion suggestions for command.
-
This allows the user to reduce the amount of typing needed.
-
-
View hints when typing command (minor)
-
Add hints to UI when typing commands.
-
This helps the user to recall the syntax of the command.
-
Appendix C: User Stories
Priorities: High (must have) - * * *, Medium (nice to have) - * *, Low (unlikely to have) - *
| Priority | As a … | I want to … | So that I can… |
|---|---|---|---|
|
new user |
see usage instructions |
refer to instructions when I forget how to use the App |
|
user |
search for books |
find new books to read |
|
user |
add books |
keep track of what to read and what have been read |
|
user |
view a listing of my books |
decide what to read next |
|
user |
view a single book |
obtain more information about it |
|
user |
delete books |
remove books I no longer want to read |
|
user |
mark a book as read |
keep track of what to read and what have been read |
|
user |
change the priority of a book |
keep track of what to read and what have been read |
|
user |
filter books by title, author, tag, priority, etc. |
easily find my books |
|
user |
sort books by title, author, tag, priority, etc. |
easily find my books |
|
user |
view the books I recently looked at |
reconsider my choices |
|
user |
undo my commands |
change my mind |
|
user |
redo my undone commands |
change my mind twice |
|
user |
view book reviews |
decide on suitability of book |
|
user |
rate books |
give recommendations to others |
|
user |
search the library catalogue |
check for availability of the book |
|
user |
add books to my watchlist |
get updated on the availability of the book in the library |
|
user |
order books from online services |
get access to them |
|
power user |
use aliases in place of full commands |
reduce the amount of typing needed |
|
user |
view hints when typing commands |
recall the syntax of the command |
|
user |
get command auto-completion suggestions |
reduce the amount of typing needed |
|
user |
change the theme of the App |
choose a theme I prefer |
|
user |
add and open eBook files |
easily open and read my eBooks |
|
user |
obtain recommendations |
get exposure to more books |
|
user |
add book reviews |
share with others my thoughts |
|
user |
open eBooks in the App |
easily read my eBooks |
|
user |
import list of books from online services |
easily populate my collection of books |
|
user |
change the font size of the App |
make the text easier on my eyes |
|
user |
encrypt my data using a password |
keep my data secure |
{More to be added}
Appendix D: Use Cases
(For all use cases below, the System is Bibliotek and the Actor is the user, unless specified otherwise)
Use case: UC1 - View my reading list
MSS
-
User requests to list all books in his reading list.
-
Bibliotek shows a list of the books.
Use case ends.
Extensions
-
2a. The list is empty.
-
2a1. Bibliotek shows an empty list.
Use case ends.
-
Use case: UC2 - Search for books
MSS
-
User performs a search with some constraints (title, author, etc.).
-
Bibliotek lists books satisfying all the constraints.
Use case ends.
Extensions
-
2a. Bibliotek doesn’t find any books satisfying all the constraints.
-
2a1. Bibliotek shows an empty list.
Use case ends.
-
-
2b. Bibliotek cannot fetch the list of books within 5s.
-
2b1. Bibliotek shows an error message.
Use case ends.
-
Use case: UC3 - View a specific book
MSS
Extensions
-
2a. User does not find the intended book in the list.
Use case restarts from step 1.
-
2b. User gives an invalid index.
-
2b1. Bibliotek shows an error message.
Use case resumes at step 2.
-
-
3a. Bibliotek cannot fetch the details of the book within 5s.
-
3a1. Bibliotek shows an error message.
Use case ends.
-
Use case: UC4 - Add a book to my reading list
MSS
Extensions
-
2a. User gives an invalid index.
-
2a1. Bibliotek shows an error message.
Use case resume at step 2.
-
-
2b. The book is already in user’s reading list.
-
2b1. Bibliotek tells user that the book is already in his reading list.
Use case ends.
-
Use case: UC5 - Rate a book
MSS
Extensions
-
2a. The given rating is out of range.
-
2a1. Bibliotek says that the rating is invalid and asks user to try again.
Use case resumes at step 2
-
{More to be added}
Appendix E: Non Functional Requirements
-
Should work on any mainstream OS as long as it has Java
1.8.0_60or higher installed. -
Should work on both 32-bit and 64-bit environments.
-
Should come with automated unit tests and open source code.
-
Should come with a user guide and a developer guide.
-
Should favor DOS style commands over Unix-style commands.
-
Should be able to hold up to 1000 books without a noticeable sluggishness in performance for typical usage.
-
Should respond to user commands within 50ms if no external API calls are required. Otherwise, respond within 10s.
-
Should be intuitive such that a new user can learn to search and add books within 10 minutes.
-
A user with above average typing speed for regular English text (i.e. not code, not system admin commands) should be able to accomplish most of the tasks faster using commands than using the mouse.
{More to be added}
Appendix H: Instructions for Manual Testing
Given below are instructions to test the app manually.
| These instructions only provide a starting point for testers to work on; testers are expected to do more exploratory testing. |
H.1. Launch and Shutdown
-
Initial launch
-
Download the jar file and copy into an empty folder
-
Double-click the jar file
Expected: Shows the GUI with a set of sample books. The window size may not be optimum.
-
-
Saving window preferences
-
Resize the window to an optimum size. Move the window to a different location. Close the window.
-
Re-launch the app by double-clicking the jar file.
Expected: The most recent window size and location is retained.
-
H.2. Deleting a book
-
Deleting a book while all books are listed
-
Prerequisites: List all books using the
listcommand. Multiple books in the list. -
Test case:
delete 1
Expected: First book is deleted from the list. Details of the deleted book shown in the status message. Timestamp in the status bar is updated. -
Test case:
delete 0
Expected: No book is deleted. Error details shown in the status message. Status bar remains the same. -
Other incorrect delete commands to try:
delete,delete x(where x is larger than the list size) {give more}
Expected: Similar to previous.
-
H.3. Searching for a book in the library
-
Prerequisites: Have a non-empty list of books in the left panel.
-
Test case:
library 1-
Immediately: Bibliotek shows
Searching for the book in the library…. Everything else remains the same. You are still able to interact with the GUI. -
After some time: Bibliotek shows
Showing availability of book: TITLE - Authors: AUTHORS. The right panel should start loading (a white screen is first seen). -
When loading is complete: A table with the availability of the book at different libraries is shown in the right panel.
-
Exception: Bibliotek shows
Failed to retrieve information from online.if the request has failed or timed out (10s). This may be because you are not connected to the internet, or the response from NLB Catalogue is slow. -
Interrupted: If you performed other commands when
libraryis in progress, note that the webpage will still load when the search is done and replace whatever is in the right panel.
-
-
Test case:
library 0,library x(where x is larger than the list size)-
Expected: Bibliotek shows
The book index provided is invalid. No change should happen other than the message showing.
-
-
Test case:
librar 1(Test integration with command autocorrect)-
Expected: Bibliotek asks whether you meant
library 1. -
If you press Enter, the command should execute the same fashion as test case in (b).
-
-
Test case:
LiBrArY 1(Test for case insensitivity)-
Expected: The command executes in the same fashion as test case in (b).
-
-
Test case:
library(Test for invalid format)-
Expected: Bibliotek shows message on correct use of
library.
-
H.4. Viewing recently selected books
-
Prerequisites: Have a non-empty list of books in the left panel.
-
Assumes: Have not recently selected any books.
-
Test case:
list,select 1,recent-
Expected: There is one book in the recently selected books list.
-
-
Test case:
search hello,select 1,recent-
Assumes: Searched completed successfully and selection is made, which is different from selection above.
-
Expected: There is another book in the recently selected book list, at index 1.
-
-
Test case:
list,select 1,recent-
Expected: The first book is brought up to the first index in the recent books list
-
-
Test case:
select 2(in the recent book list)-
Expected: The position of the book selected in the recent book list does not change in the list.
-